Activate Integration
Check the top of your PULSE Platform page to see if your dairy has DC Unlimited or DC Pro:
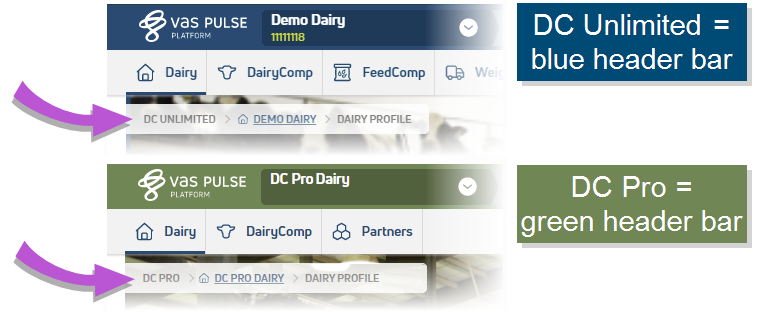
Click here to learn more about the different versions of the PULSE Platform.
Follow these steps to integrate the partner system with VAS and allow health and reproduction data and alerts to display in the PULSE Platform.
Prior to activating your integration, you must first establish a sync with your on-premise equipment and create a Nedap-Bi account. Contact your partner system representative and request the following:
- A scheduled sync with Nedap-Bi. This will allow VAS to pull refreshed data into the PULSE Platform.
- Assistance with creating a Nedap-Bi account. Be sure to note your credentials, as you will need them when connecting the integration in Step 4.
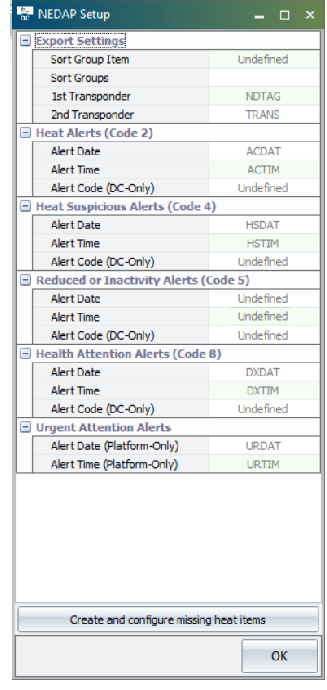
To receive animal alerts in DairyComp 305 and the PULSE Platform, you must first create and configure several items as follows:
- In DC305
 DairyComp305 - VAS Dairy Management Software, access Item Definitions (ALTER\2) and create or modify the required items to store alerts.
 - In DC305, run the command
SETMILK\M8!SETMILK\INSTALLto map your items. The Nedap Setup screen displays:
- Assign the required items.
IMPORTANT: If you are not using the suggested item names from above, be sure to correctly identify each item using your custom item names.
DC305 Field
Suggested Name
1st Transponder
NDTAG
2nd Transponder
RESP2
Heat Alert Date
ACDAT
Heat Alert Time
ACTIM
Heat Suspicious Alert Date
HSDAT
Heat Suspicious Alert Time
HSTIM
Health Alert Date
DXDAT
Health Alert Time
DXTIM
Urgent Alert Date
URDAT
Urgent Alert Time
URTIM
- Click OK.
|
Suggested Name |
Type |
Loc/Op1 |
Len/Op2 |
Description |
Standard Item Number |
|---|---|---|---|---|---|
|
NDTAG |
31 |
- |
9 |
Transponder |
4002 |
|
RESP2 |
31 |
- |
9 |
If applicable, a second Transponder (optional) |
4003 |
|
URDAT |
18 |
- |
2 |
Urgent Attention Alert Date |
4030 |
|
URTIM |
23 |
- |
2 |
Urgent Attention Alert Time |
4031 |
|
DXDAT |
18 |
- |
2 |
Health Attention Alert Date |
4033 |
|
DXTIM |
23 |
- |
2 |
Health Attention Alert Time |
4034 |
|
ACDAT |
18 |
- |
2 |
Heat Alert Date |
4039 |
|
ACTIM |
23 |
- |
2 |
Heat Alert Time |
4040 |
|
HSDAT |
18 |
- |
2 |
Heat Suspicious Alert Date |
4041 |
|
HSTIM |
23 |
- |
2 |
Heat Suspicious Alert Time |
4042 |
Follow these steps to generate partner worklists using the new items and send them to the PULSE Platform.
- In DC305, access Command Abbreviations (ALTER\3) and create or modify the required lists.
- If present, delete the MILK\VHU1 command from Command Abbreviations (ALTER\3). This command was used to import alert items to the on-premise integration and is no longer needed.
|
Abbreviation |
Content |
Title |
|---|---|---|
|
NEDAPHD |
SHOW ID |
Heat Detection Alerts |
|
NEDAPHS |
SHOW ID PEN DIM DSLH RPRO HSDAT HSTIM FOR HSDAT>-2 BY PEN |
Suspicious Heat Alerts |
|
NEDAPDX |
SHOW ID PEN DIM DSLH RPRO EVT EDAY |
Health Attention Alerts |
|
NEDAPUR |
SHOW ID PEN DIM DSLH RPRO EVT EDAY REM URDAT URTIM FOR URDAT>-2 BY PEN |
Urgent Attention Alerts |
Alert items automatically push to the PULSE Platform. No additional commands are needed to send the alerts or lists to the PULSE Platform.
Before you can activate your integration, you must first have the Nedap-Bi credentials you established as part of Step 1, as well as all required equipment installed on-site. Follow these steps to establish the connection to the partner system:
- In PULSE, navigate to Partners > Integrations Gallery > Nedap.
- Click See Details or See Requirements on the Nedap integration card.
- Follow the Connection Instructions on the right side of the page to establish the connection:
- Click Add New Alias, then complete the following fields:
- Alias: Enter your Dairy Name. If you have multiple dairies, we recommend you use different names for each alias.
- Registration Key or Producer Code: Copy or enter your software registration key or producer code from your Nedap account. Each device used to access Nedap has a unique registration key.
NOTE: If you do not have a registration key or producer code, contact your Nedap representative. - Click Authorize integration, then complete the following steps on the Nedap website that automatically opens:
- Enter your Nedap credentials and choose the installation you want to connect.
- Accept the agreement for sharing data with VAS. The Integrations Gallery site opens in the same page.
- Click Select Pens to choose pens that use Nedap. Enter the pen numbers and select the correct pens from the results list.
- Click the Connection Status toggle and verify the status switches to Active:

- Click Save.
- If necessary, click Edit Integration to make any adjustments or edits and save your changes.
- Click Add New Alias, then complete the following fields:
