Check or Treat Animals in a Worklist
Worklists include animals that need to be seen by your dairy workers or animal health experts for a variety of reasons, such as applying medicine as part of a treatment protocol or performing a vet check to diagnose a medical condition. See the instructions below for checking or treating animals by worklist type:
Follow these steps to process an animal on a hospital list:

- In the TODO tab, tap or scan any animal to determine if it is needed. Depending on the animal's status, the app plays sounds to indicate the action required and displays icon(s) to indicate if a treatment is needed (see example to the right).
 Click here for a list of audible cues and icons in hospital lists
Audible Cue
Icon
Description and/or Required Action
Treat this animal

Animal is on active protocol(s) and requires treatment. The current day of the protocol and total number of days in the protocol are displayed in the DAY field. Day 2:3 indicates the animal is on day 2 of a 3-day protocol.
Evaluate and hold

Treatment protocol(s) are complete, but there is an active milk withhold (MKDAT
Milk withdrawal date>TODAY Today's date) and/or beef withhold (BFDAT Beef withdrawal date>TODAY). Active withholds are indicated at top of the screen with a red icon and the end date: 
Check for residue

Treatment protocol(s) are complete, and the milk withholding period has ended (MKDAT=TODAY). Completed withholds are indicated at the top of the screen with a white icon and the end date:

Ready for Beef

Treatment protocol(s) are complete, and the beef withholding period has ended (BFDAT=TODAY). Completed withholds are indicated at the top of the screen with a white icon and the end date:
Needed
n/a
Animal is on the hospital list, but not currently on a protocol or a milk or beef withhold.
Buzz
n/a
Animal is not on the hospital list
Check device date; events are in the future
n/a
The diagnosis event date occurs on a future date. Verify that the device date is set correctly.
NOTE: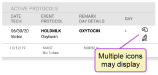 It is possible for an animal to have more than one status, and in that case you will hear more than one sound and see multiple icons. For example, if an animal's milk and beef withholds end on the same day, you will hear both "Check for residue", "Ready for beef", and both icons display.
 - If necessary, apply the treatment(s) specified for all active protocols. Active protocols are shown in bold text, and completed protocols are displayed below all active protocols.
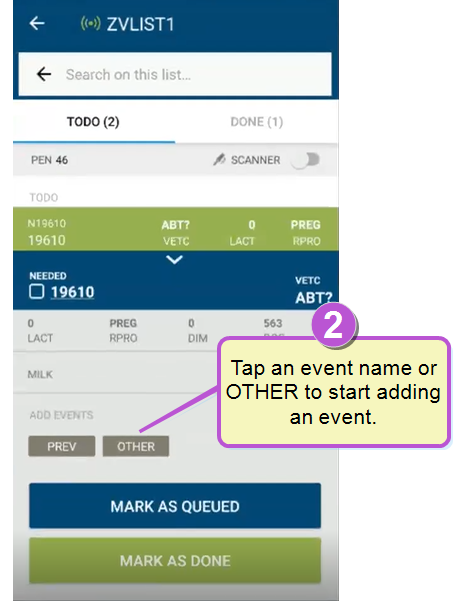
- If the animal has a new diagnosis, go to the bottom of the screen and tap the event name or OTHER to start adding an event:

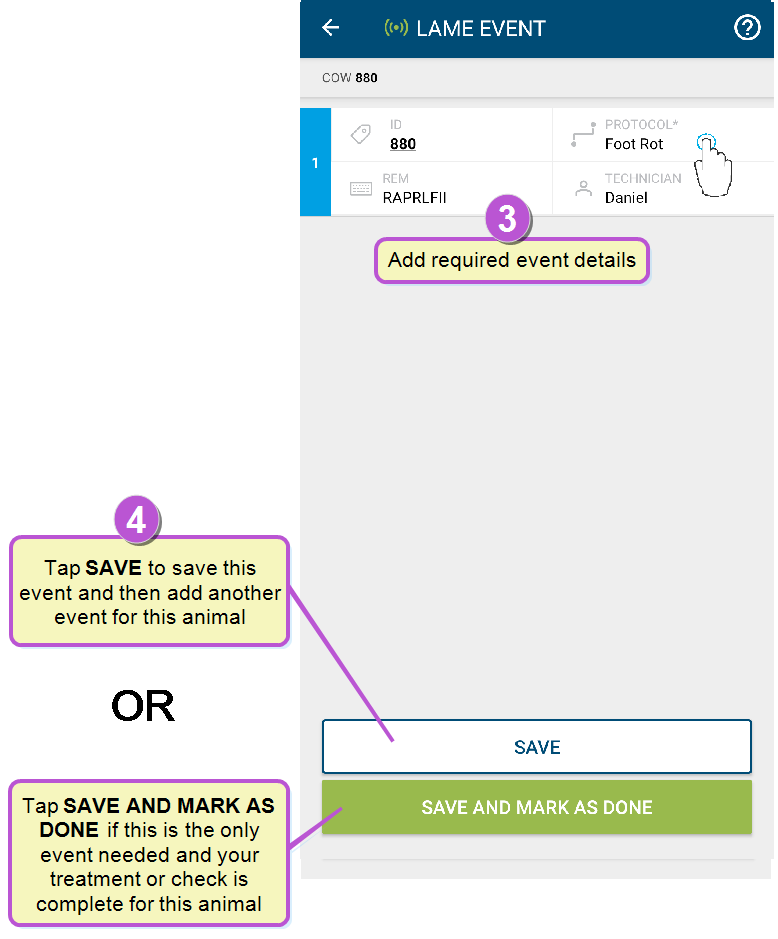
Once at the event entry screen, enter all required and optional event details. See Event Entry for more information on available events and entering their details.
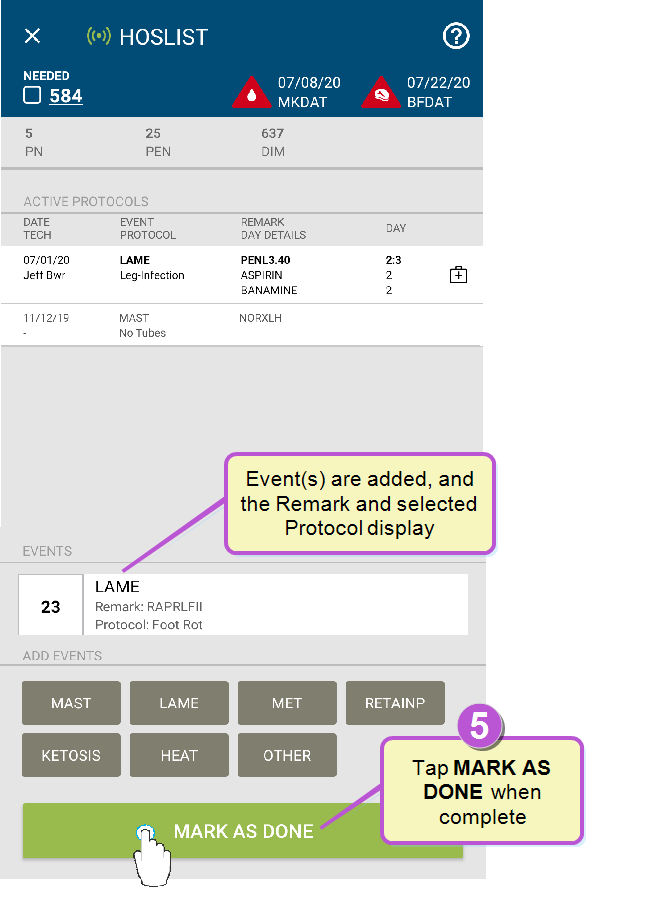
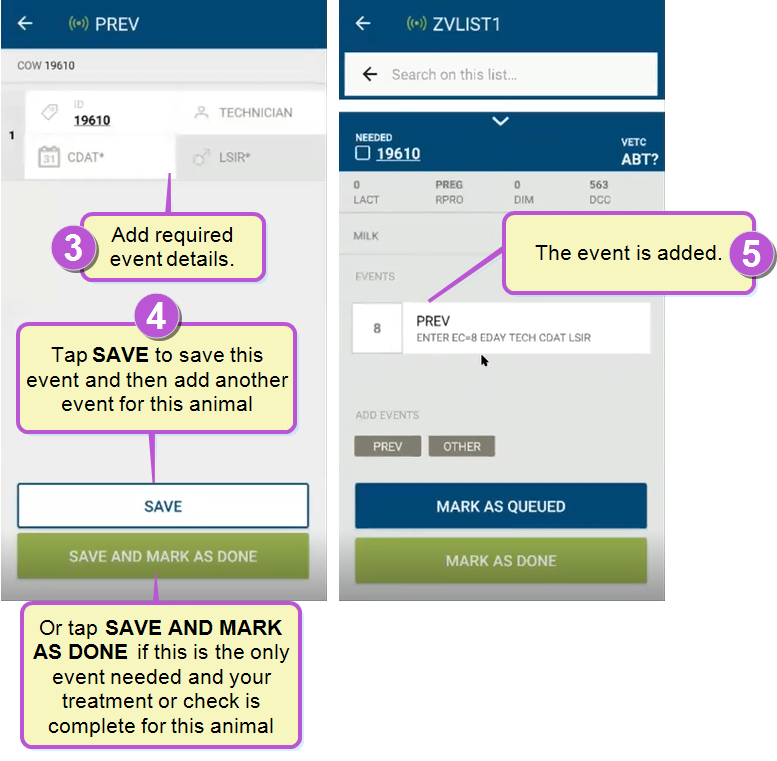
- If you only needed to add this one event and your treatment or check is complete for this animal, then tap Save and Mark as Done to add the event to the animal, including the Remark and Protocol details.
This example illustrates an event added to the animal:
 Add More Events
If you need to select additional events, tap Save and add any additional events for the animal using the steps above. If the animal has passed a check, has no milk or beef withholds, and is ready to move out of the hospital pen, proceed by adding a MOVE event.
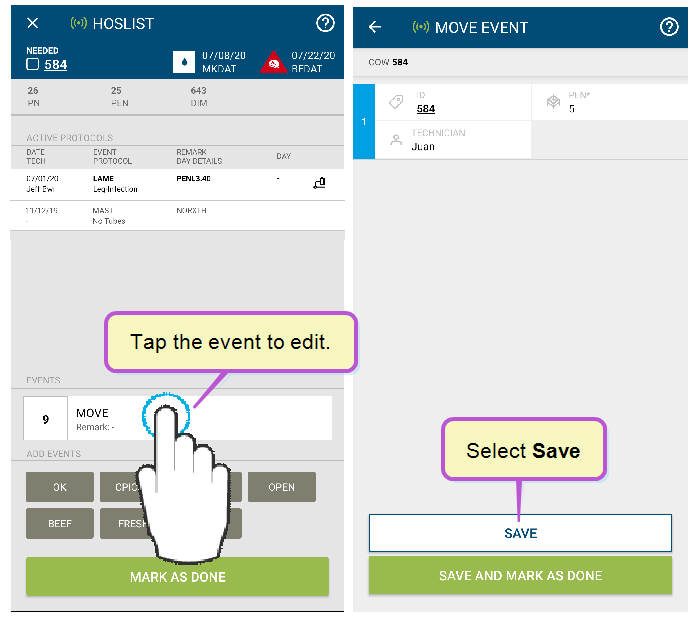
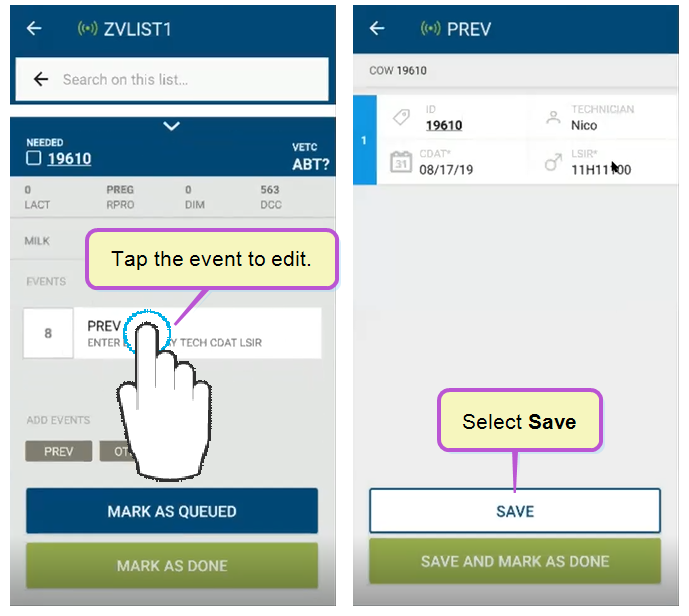
Edit an EventTo edit an event, tap the event. Make any changes on the event entry screen and tap Save.
 Delete an Event
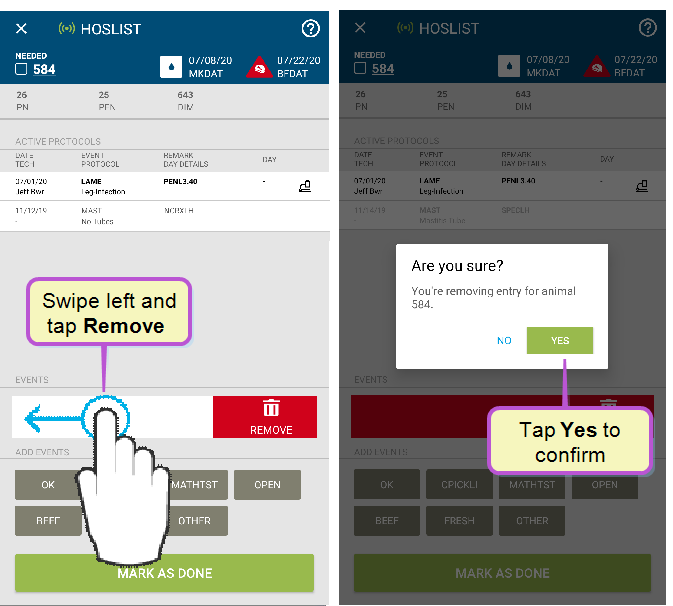
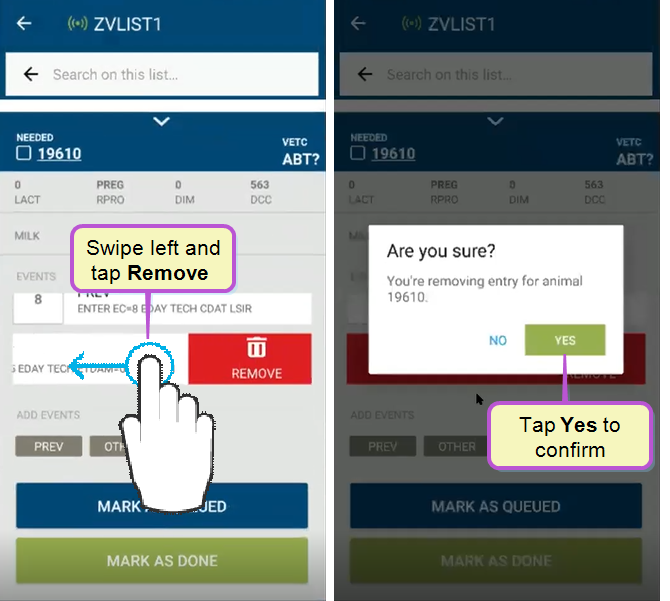
To delete an event, swipe to the left and tap Remove. Tap Yes to confirm the deletion.

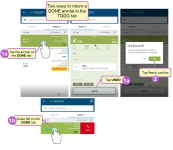
- After the treatment or check is complete and any new events are added, tap the Mark as Done box, which moves it to the DONE tab and plays the audible cue Done. You can also mark the animal as DONE directly from the event entry screen by selecting Save and Mark as Done:

- Entry date/time
- Entry method (TAPPED and SCANNED are the only methods available in the current release)
- Event(s) (for vet lists and hospital lists only)
- Pen adjustments/corrections
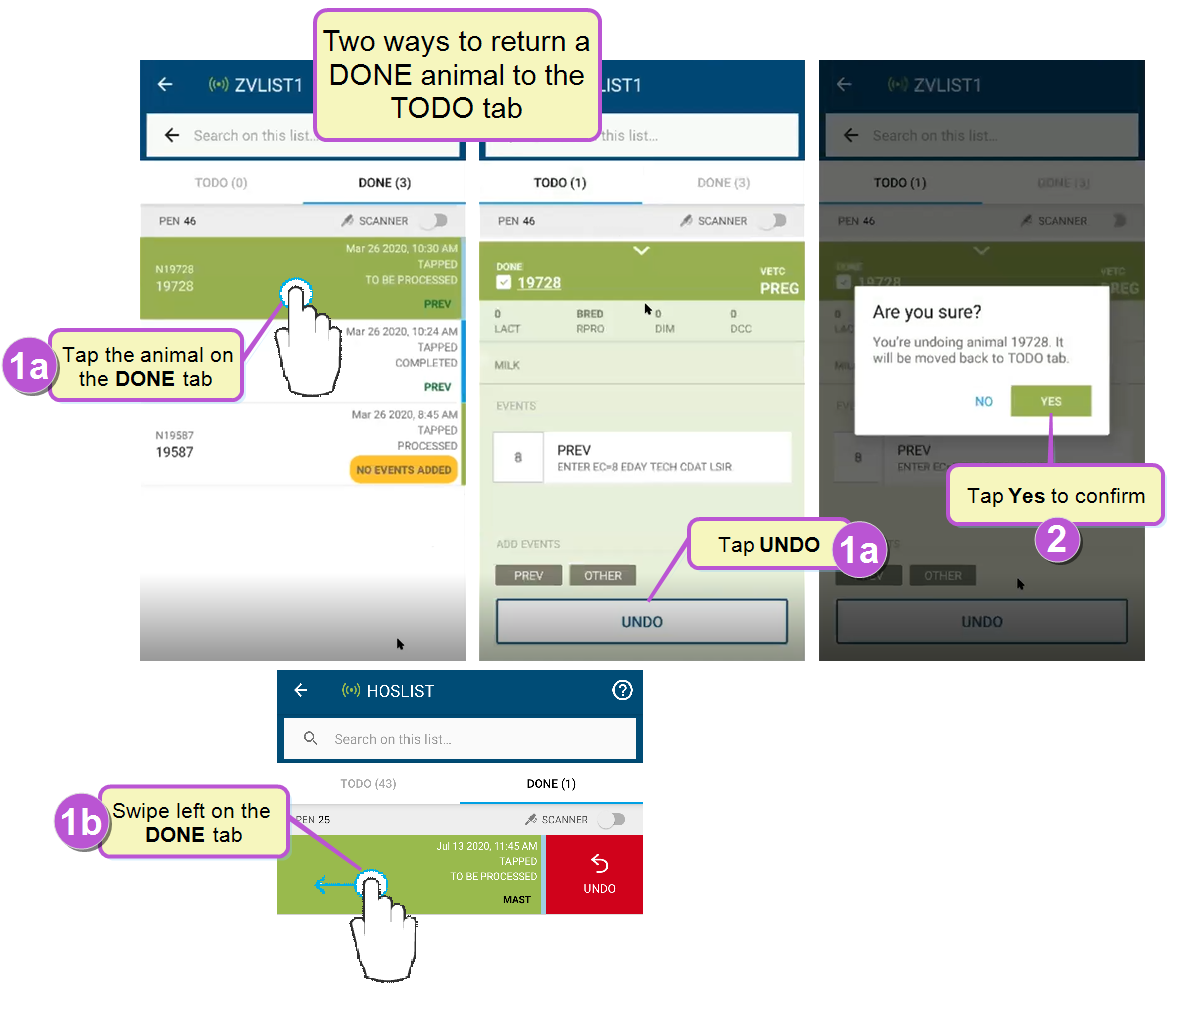
- Open the list in the mobile app, select the DONE tab, and locate the animal you want to undo.
Then, either
- Tap the animal and then choose UNDO, or
- Swipe left on the animal:
- Tap Yes to confirm the UNDO. Once you confirm, the app moves the animal back to the TODO tab.
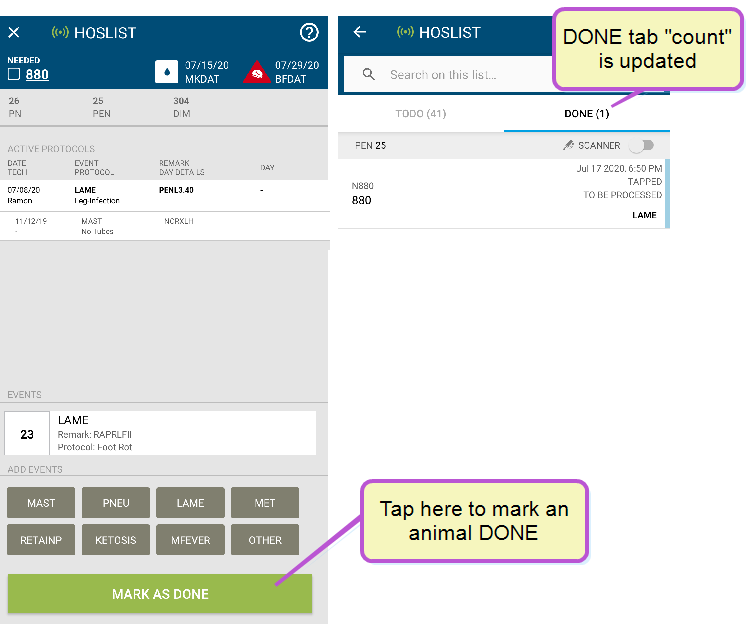
When you set an animal to DONE, the animal moves from the TODO tab to DONE, and the app sends the updated status to the PULSE Platform. The app captures the following details:
If you need to make any changes after you mark an animal as DONE, see the following:
If you mistakenly mark an animal as DONE and have not processed the update yet, follow these steps to undo it:
If you have marked an animal as DONE and have not processed the update yet, you can still edit or add events to the animal. Verify that the animal status is RECEIVED on the DONE tab, and proceed to modifying an event.
Follow these steps to process an animal on a to-do list:
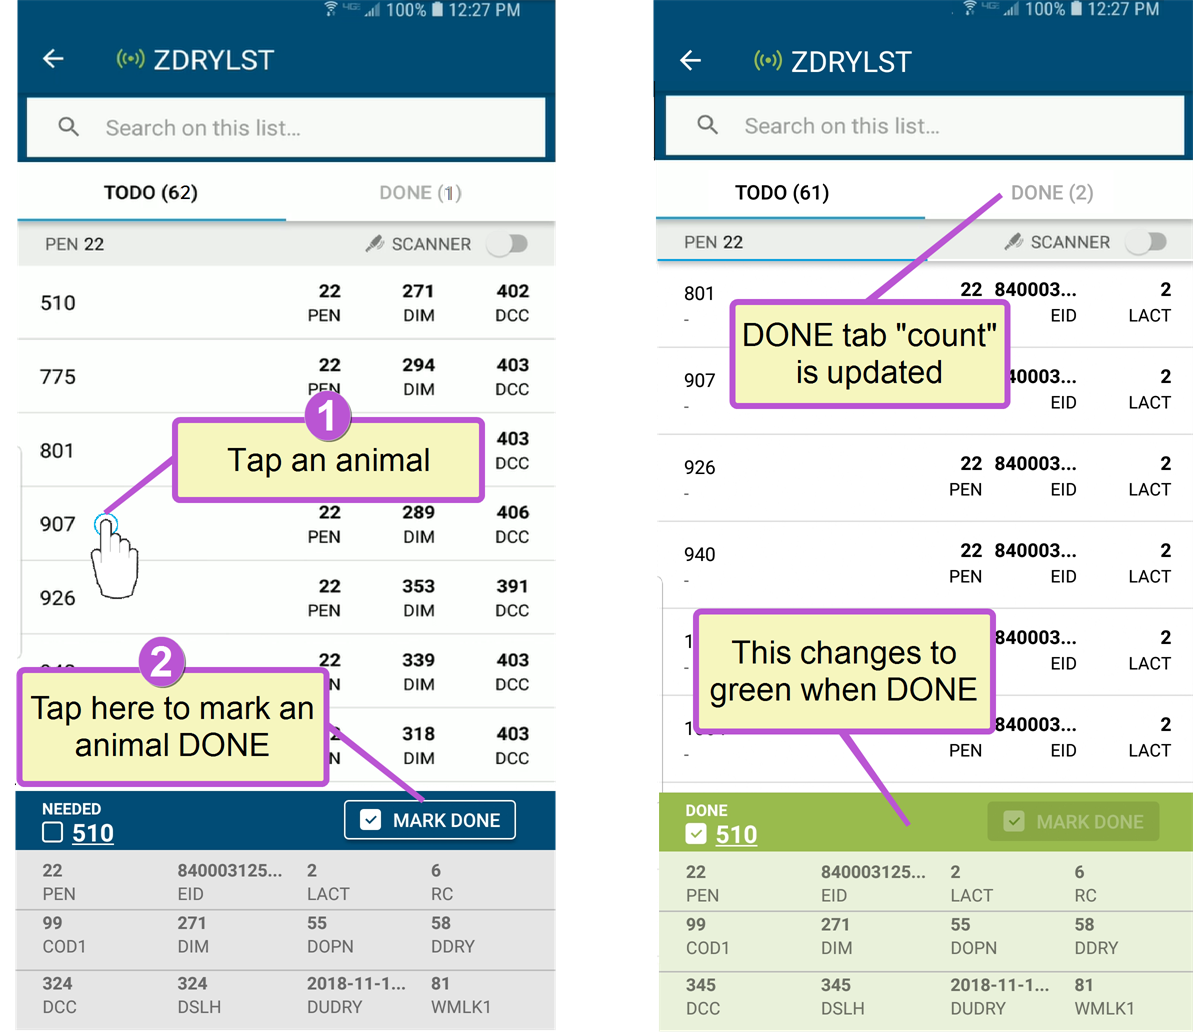
- In the TODO tab, you can tap any animal to determine if it is needed (indicated by the audible cue Need Her).
- If the animal is needed, tap the Mark Done box, which moves it to the DONE tab and plays the audible cue Done.
If you are using a scanner and a scanned animal is needed, the animal automatically moves to the DONE tab. See If you are using a scanner below to learn more about using scanners with worklists.
Follow these steps to process an animal on a vet list:
- In the TODO tab, tap or scan any animal to determine if it is needed. Depending on the vet code for the animal, the app plays a sound to indicate the action required.
- Tap an event name or OTHER to start adding an event. Depending on the vet code or reason for the check, the list of preassigned events varies. See Configure PULSE Platform Vet Lists for more information on assigning events to a vet code.

- Once at the event entry screen, enter all required and optional event details. See Event Entry for more information on available events and entering their details.
- Tap Save if you have additional events to add or Save and Mark as Done if this is the only event needed and your check is complete for this animal.
- The event is added for the animal. Add any additional events for the animal using the steps above. If you need to return to the animal at a later point or to make other changes, use the following options before marking the animal as Done.

- Mark the animal DONE.
- Entry date/time
- Entry method (TAPPED and SCANNED are the only methods available in the current release)
- Event(s) (for vet lists and hospital lists only)
- Pen adjustments/corrections
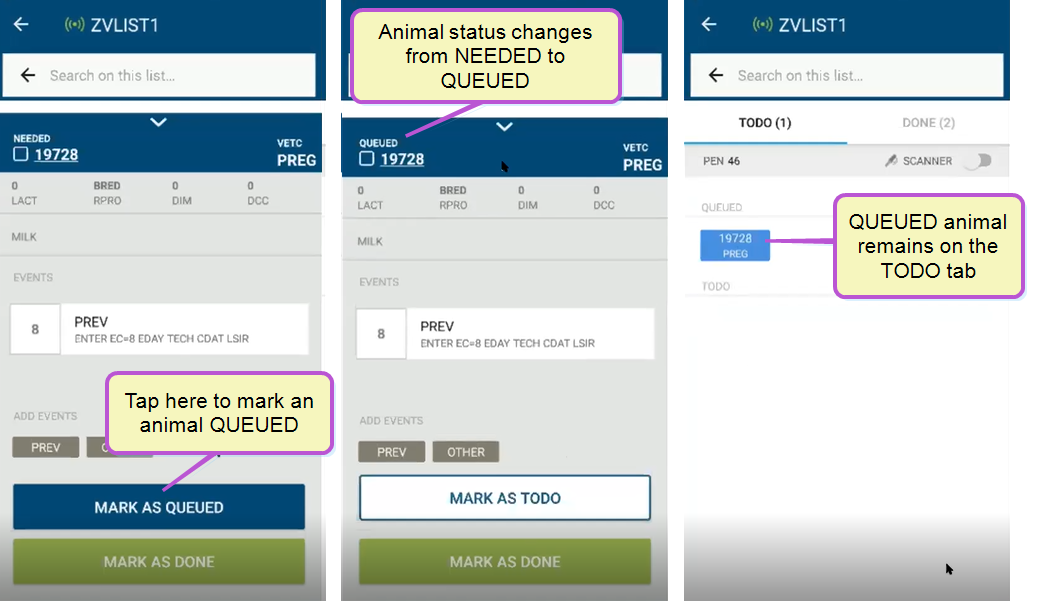
Tap Mark as Queued if you require more time or additional information to complete the animal check or to gather diagnosis details.
This changes the animal status to queued, and it remains in the QUEUED section of the TODO tab:
To edit an event, tap the event. Make any changes on the event entry screen and tap Save.
To delete an event, swipe to the left and tap Remove. Tap Yes to confirm the deletion.
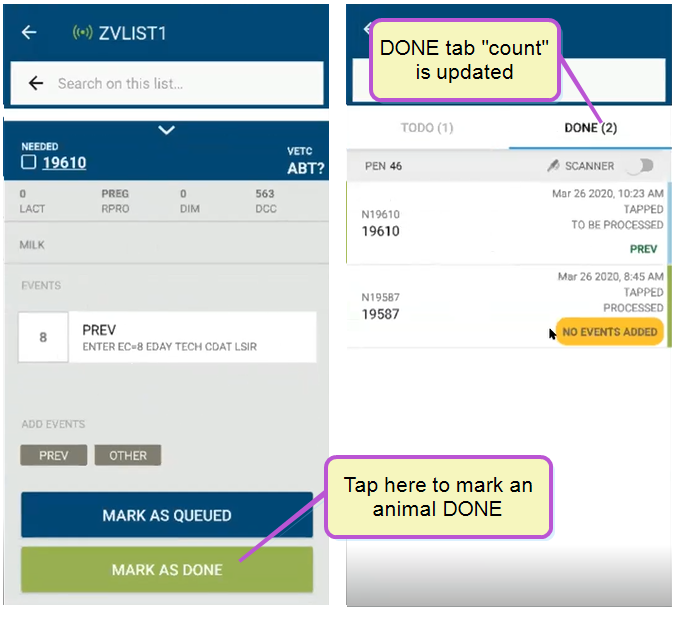
After events are added for the animal, tap the Mark as Done box, which moves it to the DONE tab and plays the audible cue Done. You can also mark the animal as DONE directly from the event entry screen by selecting Save and Mark as Done:
When you set an animal to DONE, the animal moves from the TODO tab to DONE, and the app sends the updated status to the PULSE Platform. The app captures the following details:
If you need to make any changes after you mark an animal as DONE, see the following:
If you mistakenly mark an animal as DONE and have not processed the update yet, follow these steps to undo it:
- Open the list in the mobile app, select the DONE tab, and locate the animal you want to undo.
Then, either
- Tap the animal and then choose UNDO, or
- Swipe left on the animal:
- Tap Yes to confirm the UNDO. Once you confirm, the app moves the animal back to the TODO tab.
Proceed to Send Worklist Updates to the PULSE Platform and DC305 when done treating or checking animals on your worklist.
Need help with other tasks?
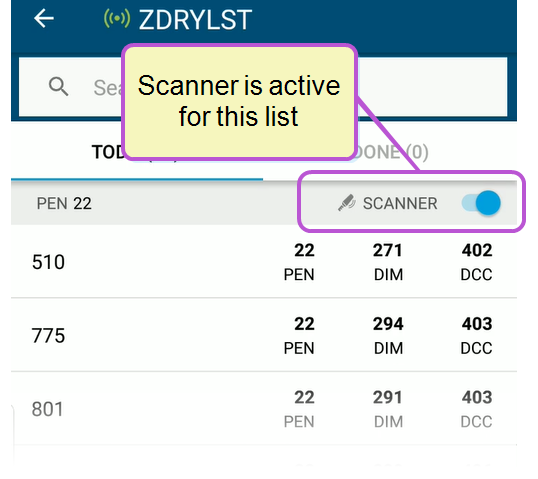
- Make sure the scanner is activated for the list (see example below).
- Scan animals to see if they are on a worklist. For to-do lists, animals automatically move to DONE tab if they are scanned and on the list. Vet lists and hospital lists require you to mark animals as done after you finish processing them.
- If a scanned animal is not needed, the app plays an audible "not needed" buzz, and the animal number displays briefly in red at the bottom of the screen. Scan or tap another animal to continue.
Note that the scanner connection switch is only available in the Android version of the app. iOS devices automatically connect to paired scanners, so instead of seeing the switch, you will simply see that the scanner status is either connected (blue) or disconnected (gray).
See Working with RFID Scanners for help using a scanner with the mobile app.
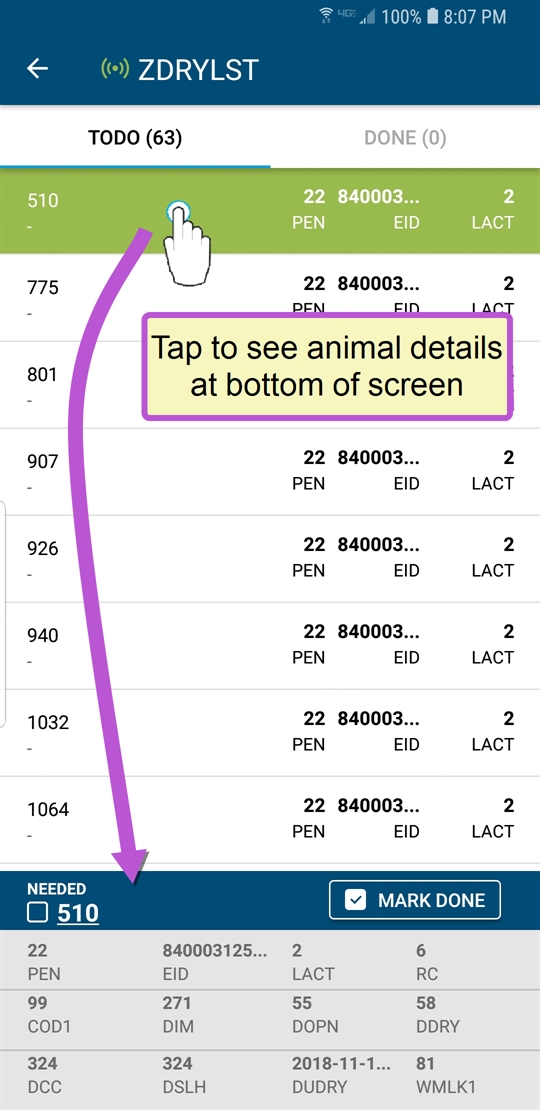
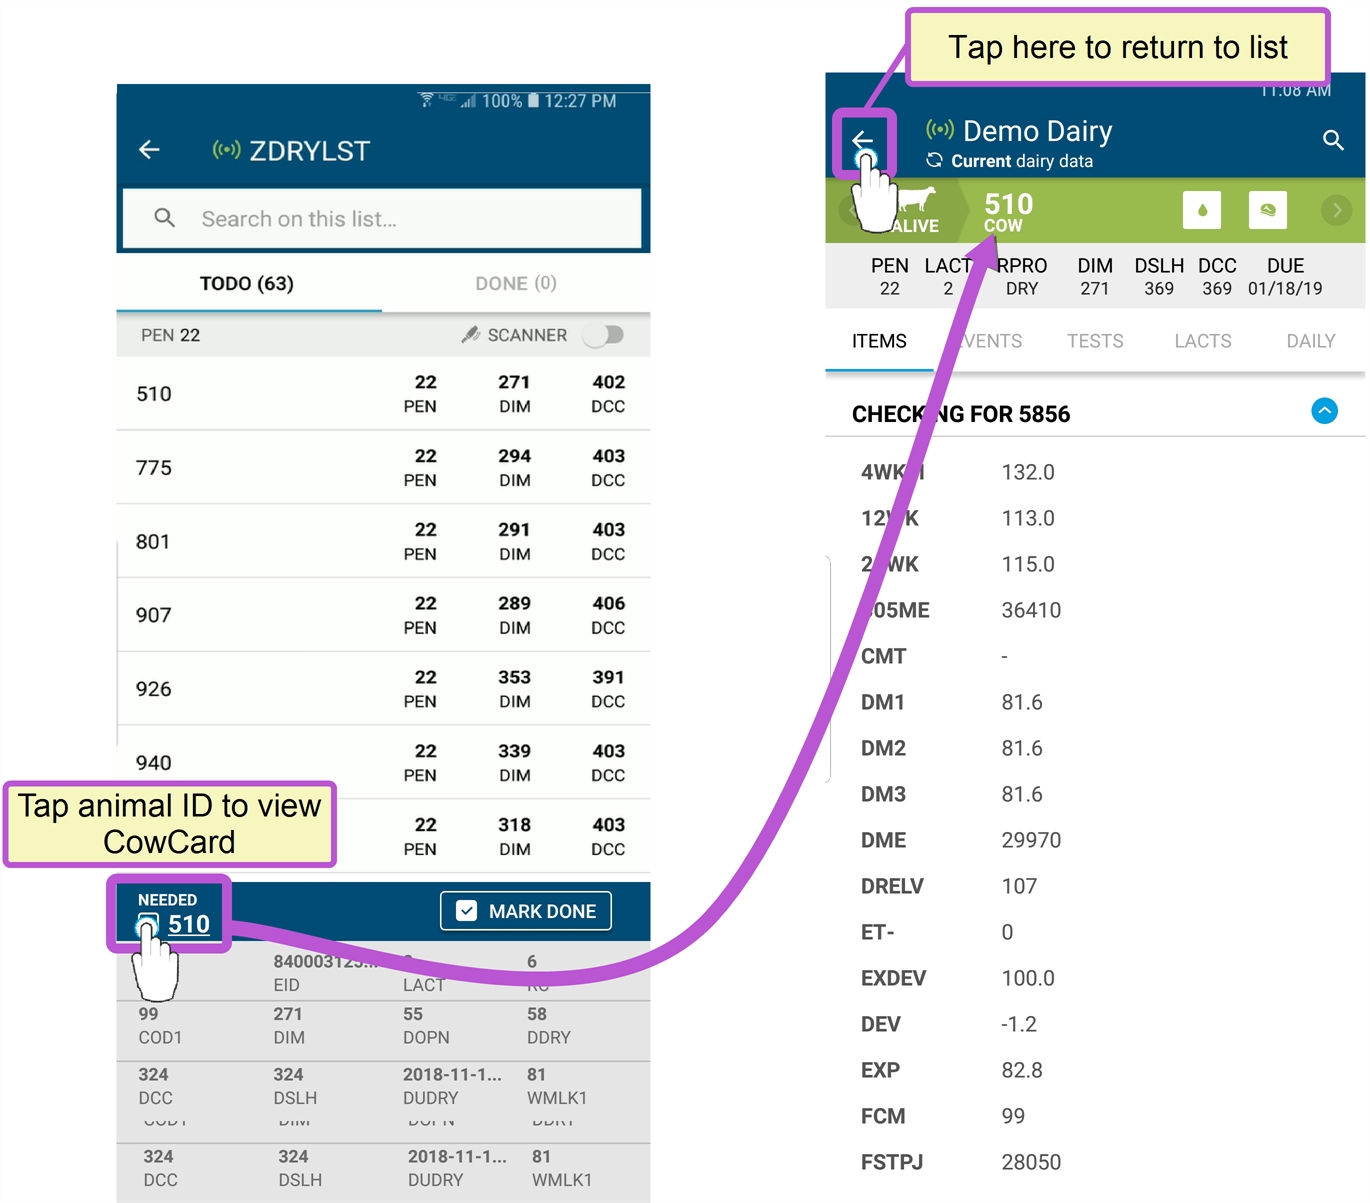
Any time you select an animal in a list, its details are displayed at the bottom of the page:
When you set an animal to DONE, the animal moves from the TODO tab to DONE, and the app sends the updated status to the PULSE Platform. The app captures the following details:
- Entry date/time
- Entry method (TAPPED and SCANNED are the only methods available in the current release)
- Event(s) (for vet lists and hospital lists only)
- Pen adjustments/corrections
The DONE tab lists all animals that have already been marked DONE and are either waiting to be processed or are already complete:
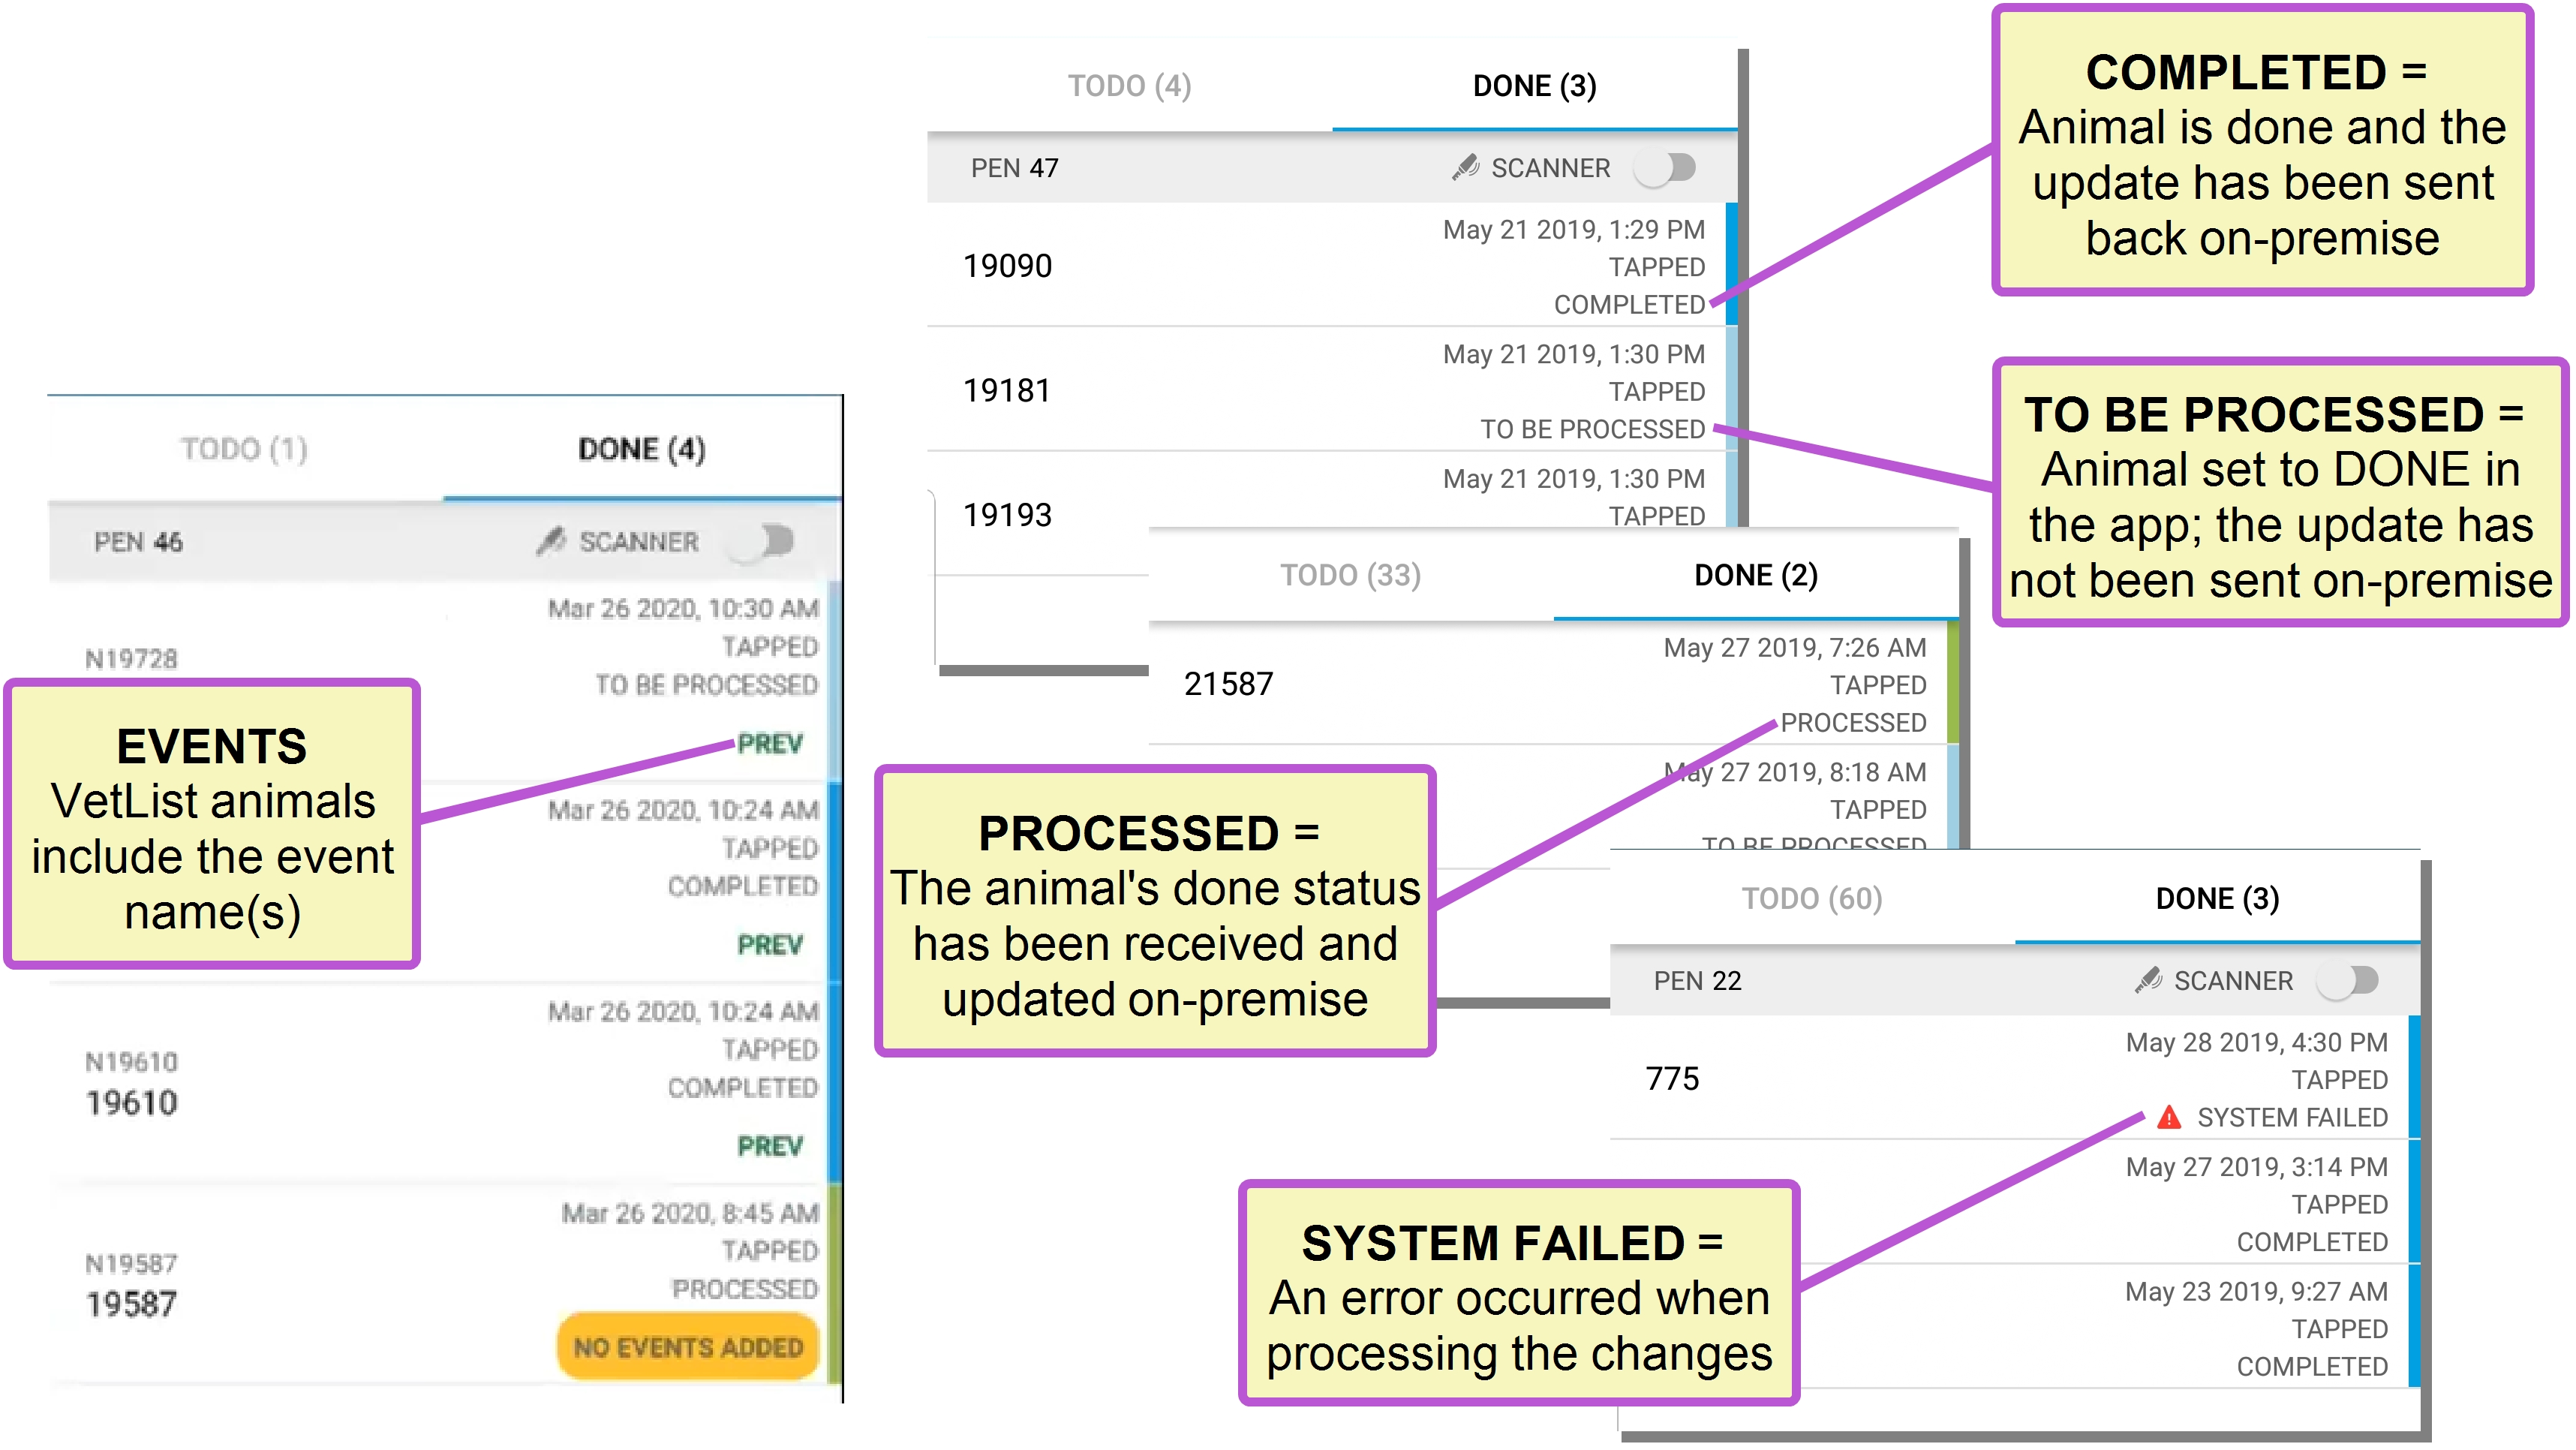
For animals that are in RECEIVED state, see the instructions to process your changes above.
If you accidentally mark an animal as DONE, see the instructions to undo the change below.
If you mistakenly mark an animal as DONE and have not processed the update yet, follow these steps to undo it:
- Open the list in the mobile app, select the DONE tab, and locate the animal you want to undo.
Then, either
- Tap the animal and then choose UNDO, or
- Swipe left on the animal:
- Tap Yes to confirm the UNDO. Once you confirm, the app moves the animal back to the TODO tab.
Sometimes animals accidentally end up in the wrong pen, and other times, animals are correctly placed into a new pen but their CowCard has not yet been updated to track the pen move. For these reasons, the PULSE Platform mobile app allows you to conveniently make pen corrections when processing animals in a worklist.

For more information on your pen correction options, see Making pen corrections.
Be aware that multiple users may be processing changes and sending them back to DairyComp 305 many times throughout the day. Some workers may choose to process changes at the end of the day after finishing all list updates. Some may choose to process changes after updating a few animals at a time. Some may not be able to send their processed updates back on‑premise because they do not have an active WiFi or data connection.
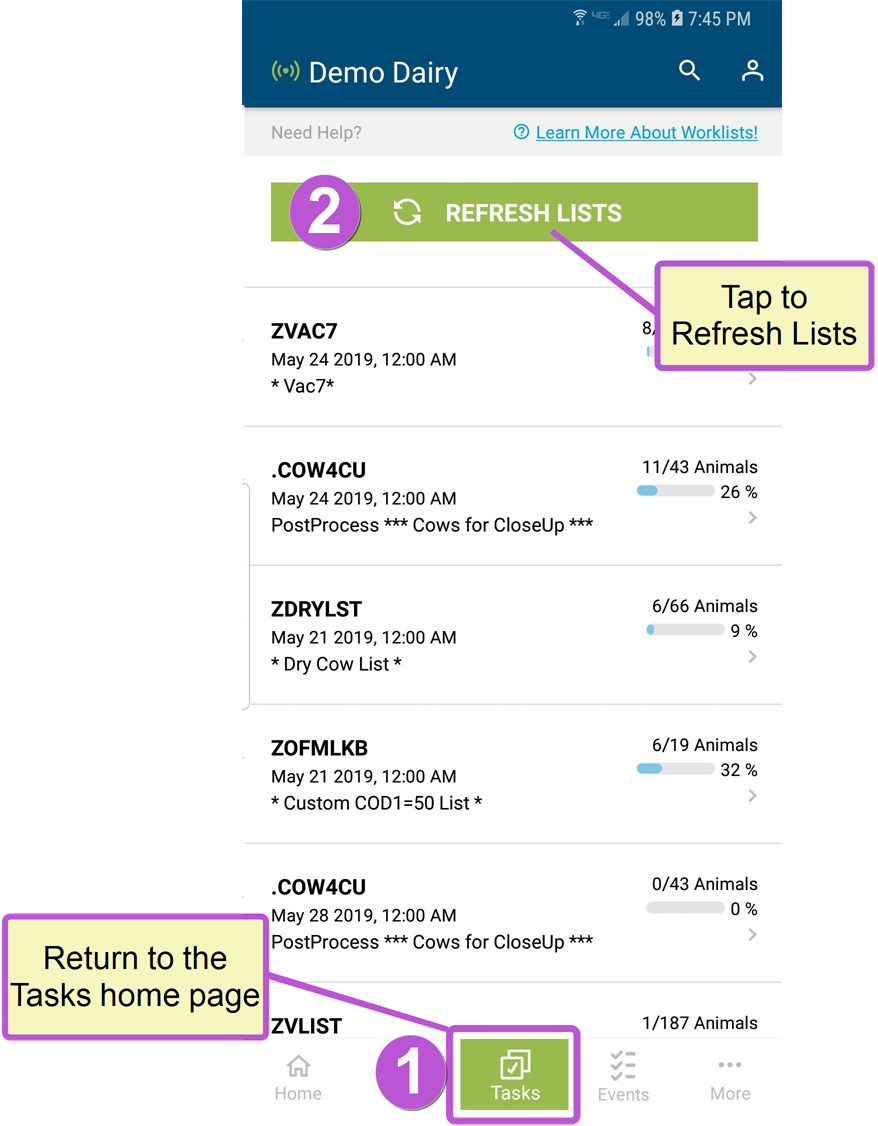
For these reasons, it's a good idea to use the Refresh Lists option when you can.
To refresh your lists, your mobile device must have an active internet connection. To make sure you have all of the latest updates, consider refreshing your lists before going out to the field to work on them, as well as any convenient time afterward, when you have an active WiFi or data connection.
Follow these steps to refresh your lists:
- Return to the Lists home page.
- Tap the green Refresh Lists button.