Events
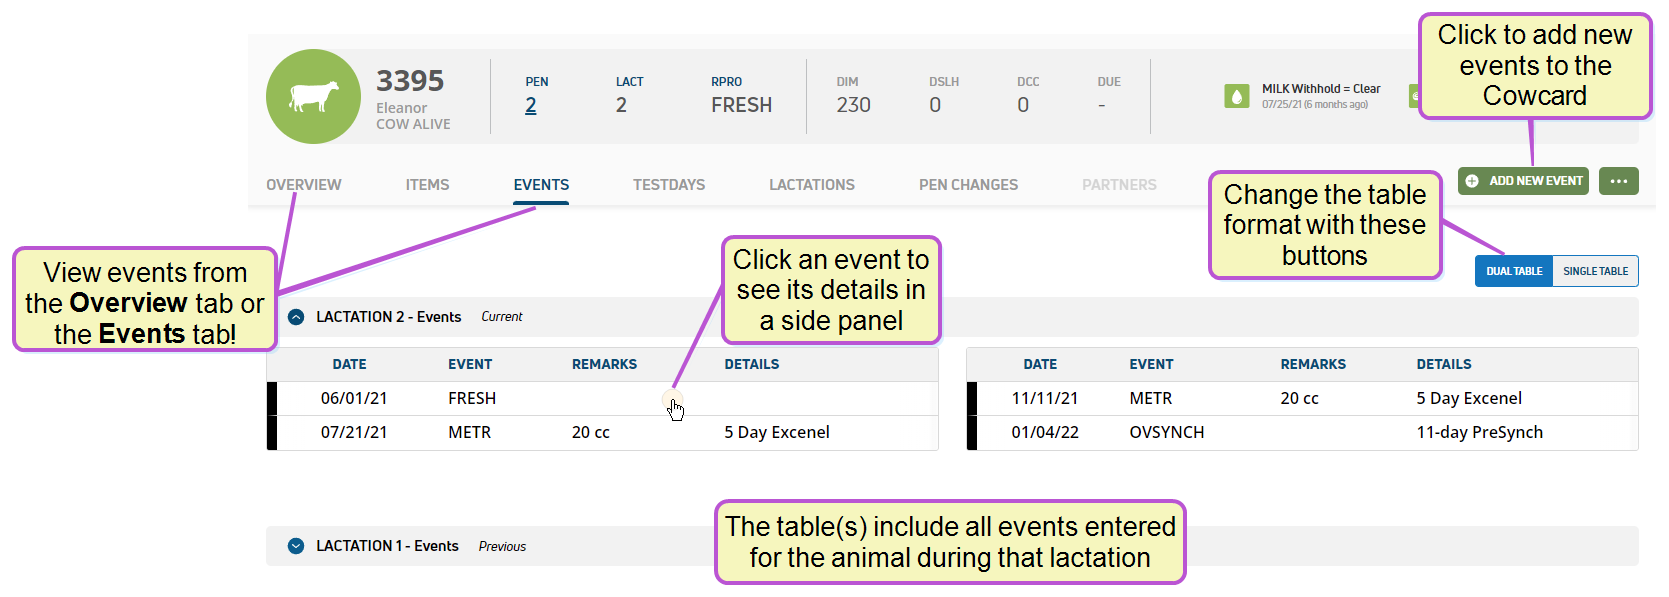
Events are specific occurrences (a pregnancy or birth, for example) that happen to an animal, and they typically contain more information than an item. You can even create specific items, such as the date of a breeding, based on an event. All events for an animal are displayed on the Events page of its CowCard:
The web version of the PULSE Platform allows you to add, edit, and delete events directly from the animal's CowCard. You can add one event or multiple events, and then save the event(s) to view on the CowCard once processed.
See the topics below when working with Events in PULSE:
The Events page organizes all events recorded for the animal within lactation cycle drop-downs for easier navigation. You can change the table style in the lactation drop-downs at any time by selecting the Dual Table or Single Table buttons, as illustrated in the image above.
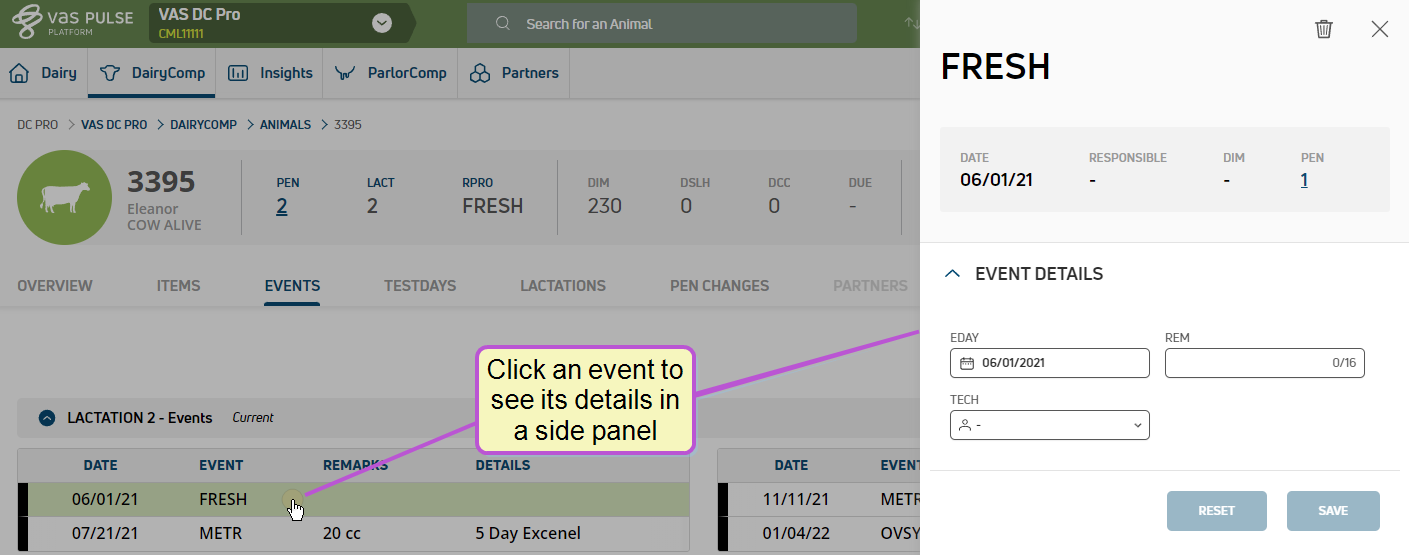
Click an event to view additional details in a side panel:
Only users who are assigned to a Role with Herd Write permissions can use this feature. If your account only has Herd Read permissions, you will not be able to use this feature. See Edit User Permissions and Manage Roles for more information.
- From the animal's CowCard, click the Add New Event button.
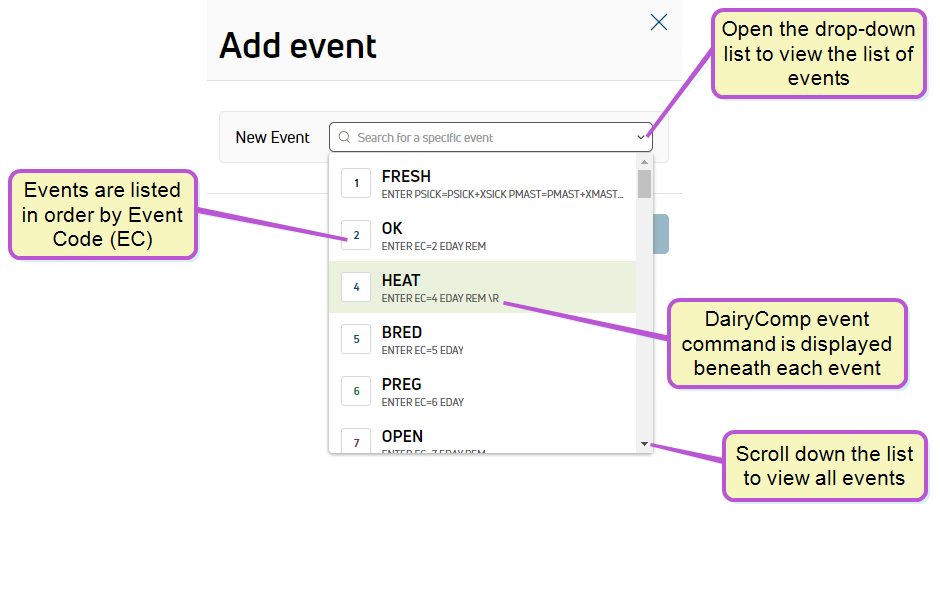
- The system displays a side panel, where you can select the event you want to add from the New Event drop-down list:
 Follow the guidelines below when working with events.
Events are listed in order by Event Code (EC).
Scroll down the list to view all events.
The DairyComp event command is displayed below each event.
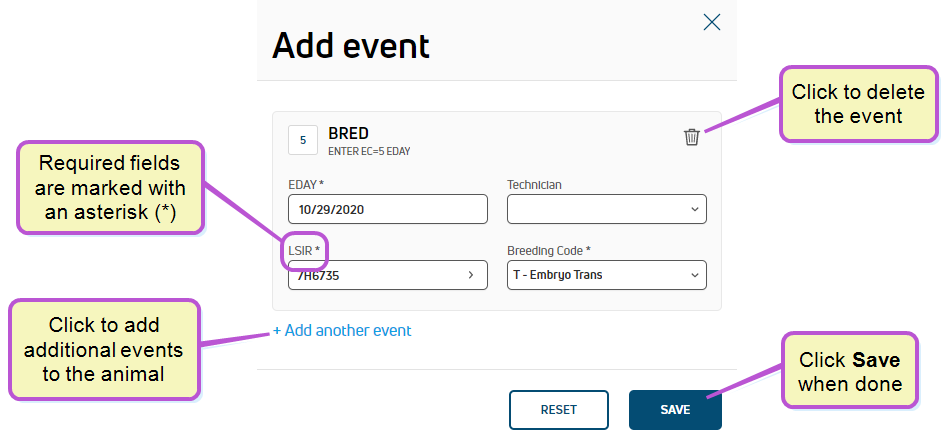
- Enter the details for the event in the applicable fields:
The details required in this step depend upon the type of event you're adding. The example above adds a BRED event. For more information about the details required for each type of event, see Event Definitions.
Click here for some guidance on adding event details.- Required fields are marked with an asterisk (*).
- To add additional events to the animal, click Add another event.
- To remove an event, click the delete icon
 .
.
IMPORTANT: Depending on the type of event you're adding, you may receive system prompts that warn you about an animal's status. See Warning Messages when Adding Animals to Events to learn more. - Define protocols for the event (if applicable).
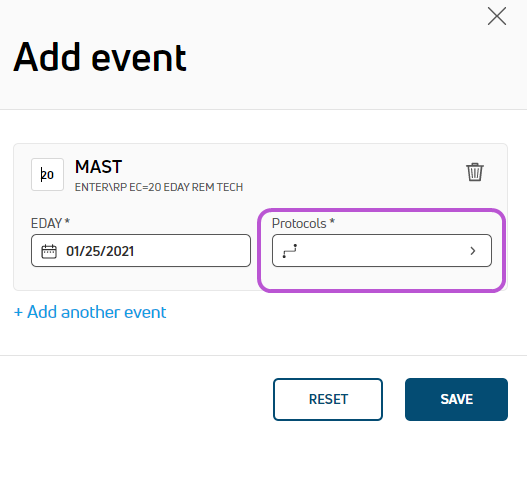
Certain events allow you to select a treatment protocol, such as drugs to be administered or treatments to be applied to the animal's hooves or udders. If you are entering an event that includes protocols, you will see the Protocols
Dairy protocols include a series of treatments or tasks that follow a prescribed order and schedule. Protocols may be defined for reproduction purposes, to treat an illness, or for routine vaccinations. field as an option for the event: How do you add protocols to an event?
The treatment protocols for each eligible event are pre-configured so that they are available when you add the event to an animal. (See Protocols to learn more.)
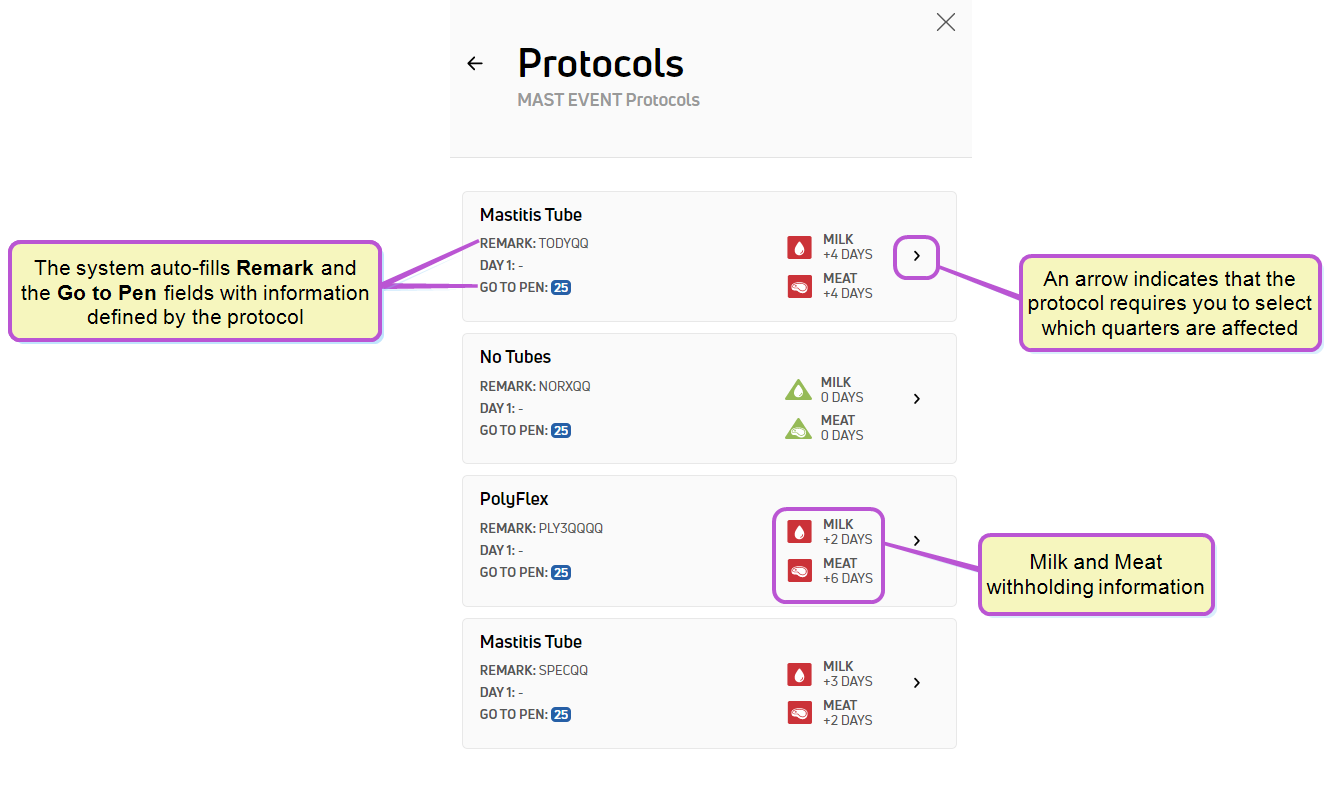
- Click the Protocols field to view the available protocols for the event:
For each protocol, the system displays the corresponding Milk and Meat withholdings. Additionally, the system auto-fills the Remark field and the animal's pen (Go To Pen) based on the selected protocol. You may select only one protocol per event.
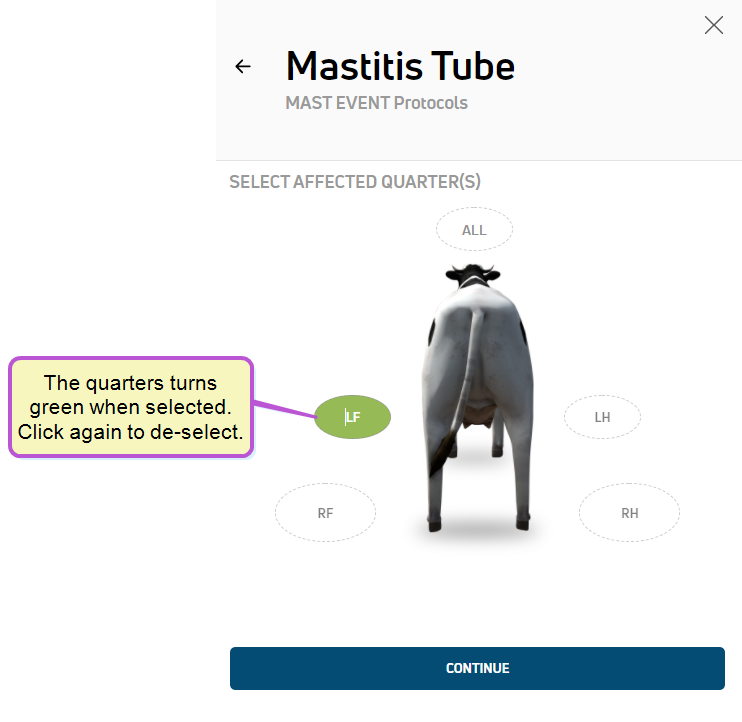
- If you select a protocol that requires you to choose which hoof or quarter of the udder is affected, the system opens a page where you can select the quarter(s):

The labels you see may be different from those listed below, but the typical ones are:
- ALL - Selects all quarters
- LF - Left Front hoof or teat
- RF - Right Front hoof or teat
- LH - Left Hind hoof or teat
- RH - Right Hind hoof or teat
See Events with Protocols to learn more.
- When you are done selecting the affected quarters, click Continue to return to the Add Event window. From here, you can choose additional events for the animal, and then click Save.IMPORTANT: The mobile app section of this document includes additional information about using protocols with events. See Events with Protocols to learn more.
- Click the Protocols field to view the available protocols for the event:
- Click Add another event to add additional events to the animal (optional).
- Once you have entered the events and details, click Save.What happens when you save an event?
Saved events display on the CowCard immediately if you have DC Pro. If you have DC Unlimited, saved events display after the system synchronizes with the on-premise DairyComp.
Only users who are assigned to a Role with Herd Write permissions can use this feature. If your account only has Herd Read permissions, you will not be able to use this feature. See Edit User Permissions and Manage Roles for more information.
This feature/option is available only for DC Pro Beta testers. DC Unlimited subscribers will not see it in the PULSE Platform because this functionality is available in on-premise DairyComp.
Check the top of your PULSE Platform page to see if your dairy has DC Unlimited or DC Pro:
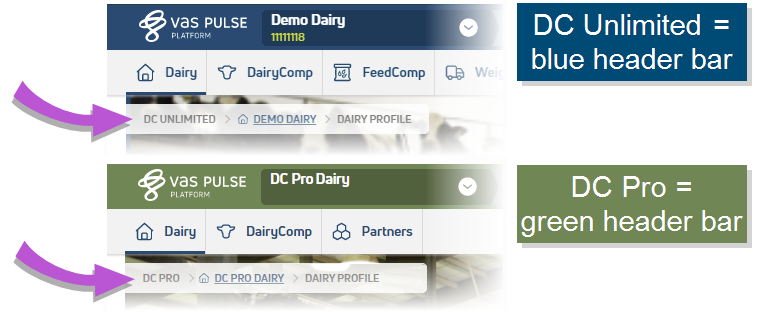
Click here to learn more about the different versions of PULSE.
- On the animal's CowCard, go to the Overview tab or the Events tab.
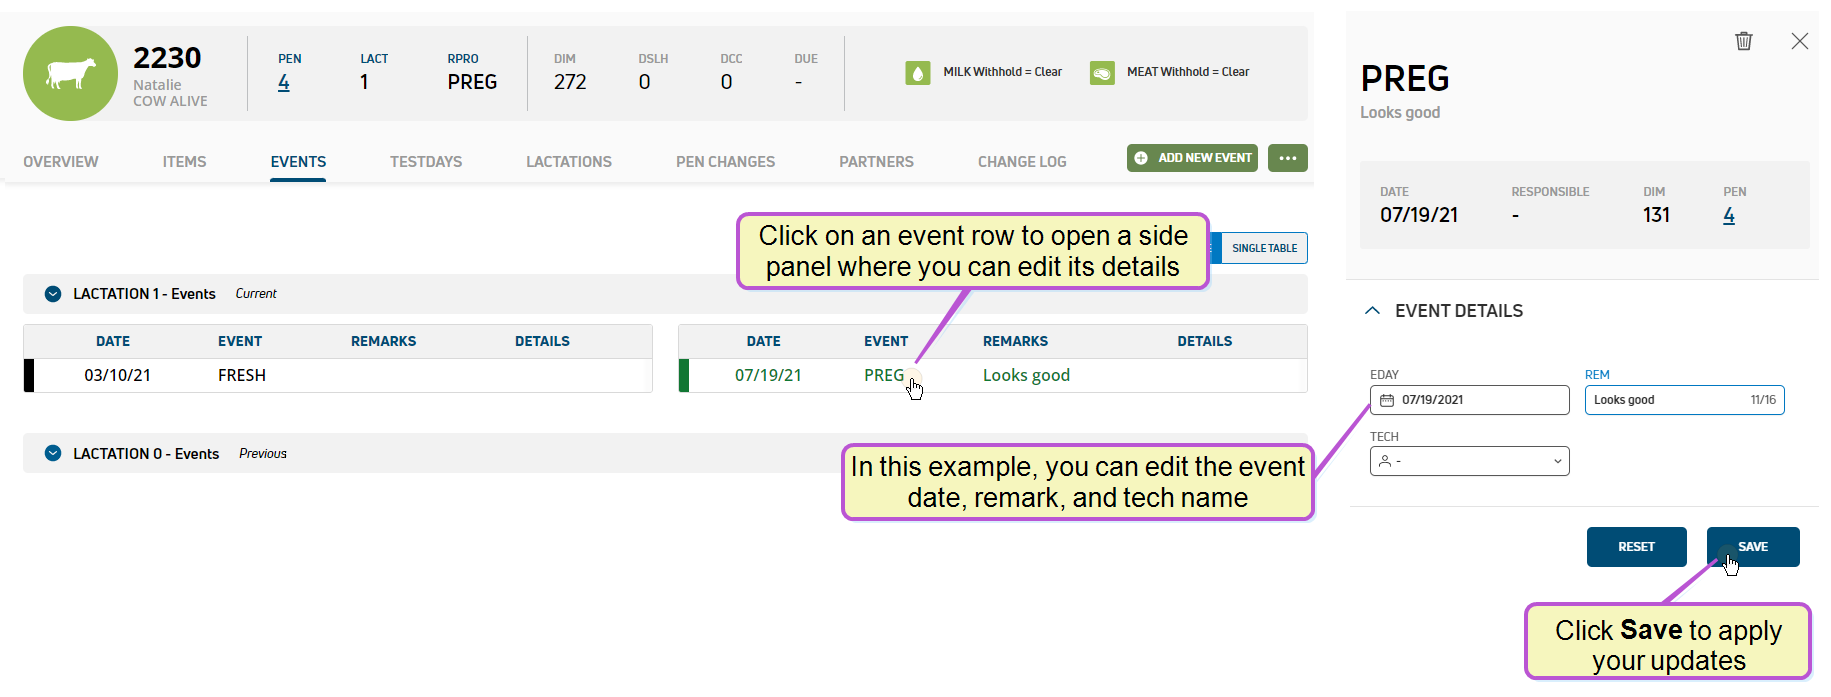
- Click on the desired event to open the event's side panel:
- Follow the guidelines below to complete your edits:
- You can only edit events from the current lactation.
- Some event updates may reverse past event actions. For example, if you delete a MOVE event where an animal was moved to a new pen, the system will move the animal back to its previous pen.
-
Click Save to apply your changes.
Only users who are assigned to a Role with Herd Write permissions can use this feature. If your account only has Herd Read permissions, you will not be able to use this feature. See Edit User Permissions and Manage Roles for more information.
NOTE: Only events from the current lactation can be deleted.
- On the animal's CowCard, go to the Overview tab or the Events tab.
- Click on the desired event to view its details in a side panel.
- Click the delete icon in the upper right corner, then click Delete in the pop-up confirmation window to complete the deletion.
In the current release, the VAS PULSE Platform supports all "sacred" events except the Bullpen event. It also supports all custom events. See Events Currently Supported by the PULSE Platform for more information.
The contents below require access to the on-premise version of DairyComp 305 and are only available to DC Unlimited subscribers.
Check the top of your PULSE Platform page to see if your dairy has DC Unlimited or DC Pro:
Click here to learn more about the different versions of PULSE.
DC Unlimited subscribers can create and customize events directly through the PULSE Platform or in their on-premise version of DairyComp. Your updates then carry forward to the mobile app and the platform you didn't use to customize the event during the regularly scheduled data synchronization.
See the topics below to learn more about customizing events in DC305![]() DairyComp305 - VAS Dairy Management Software and PULSE:
DairyComp305 - VAS Dairy Management Software and PULSE:
Knowing the finer details of event editing and creation in the on-premise DairyComp can be daunting, especially if the majority of your time is spent in the PULSE Platform. Use the following articles in the DairyComp 305 online help site to answer any questions:
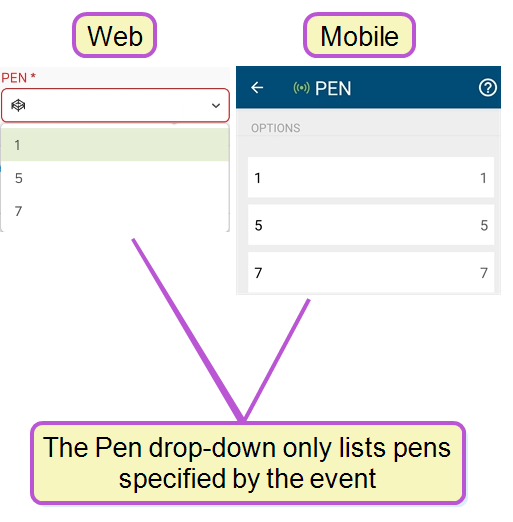
When creating or updating events that require an animal pen to be selected, you can also specify which pens are available in the Pen drop-down when the event is selected.
Let's say you want to update the PREG![]() Pregnant event to now move the chosen animal(s) into pen 1, 5, or 7, which you have designated for pregnant animals only. To include this new qualification to your PREG event, you would update the event to read as:
Pregnant event to now move the chosen animal(s) into pen 1, 5, or 7, which you have designated for pregnant animals only. To include this new qualification to your PREG event, you would update the event to read as:
ENTER EC=6 EDAY PEN=1;5;7
When your updates carry forward during the regularly scheduled data synchronization, the new Pen field in the PREG event will only display the options listed in the command instead of every pen on the dairy:
Additional information about events is available in the mobile app Event Entry topics, including: