Animals
The Animals page lists all of the animals in your dairy. You can view detailed data for each animal, retrieve an animal's CowCard, and add new animals to the herd
You can find this feature under the DairyComp menu. See the topics below for help using the Animals list:
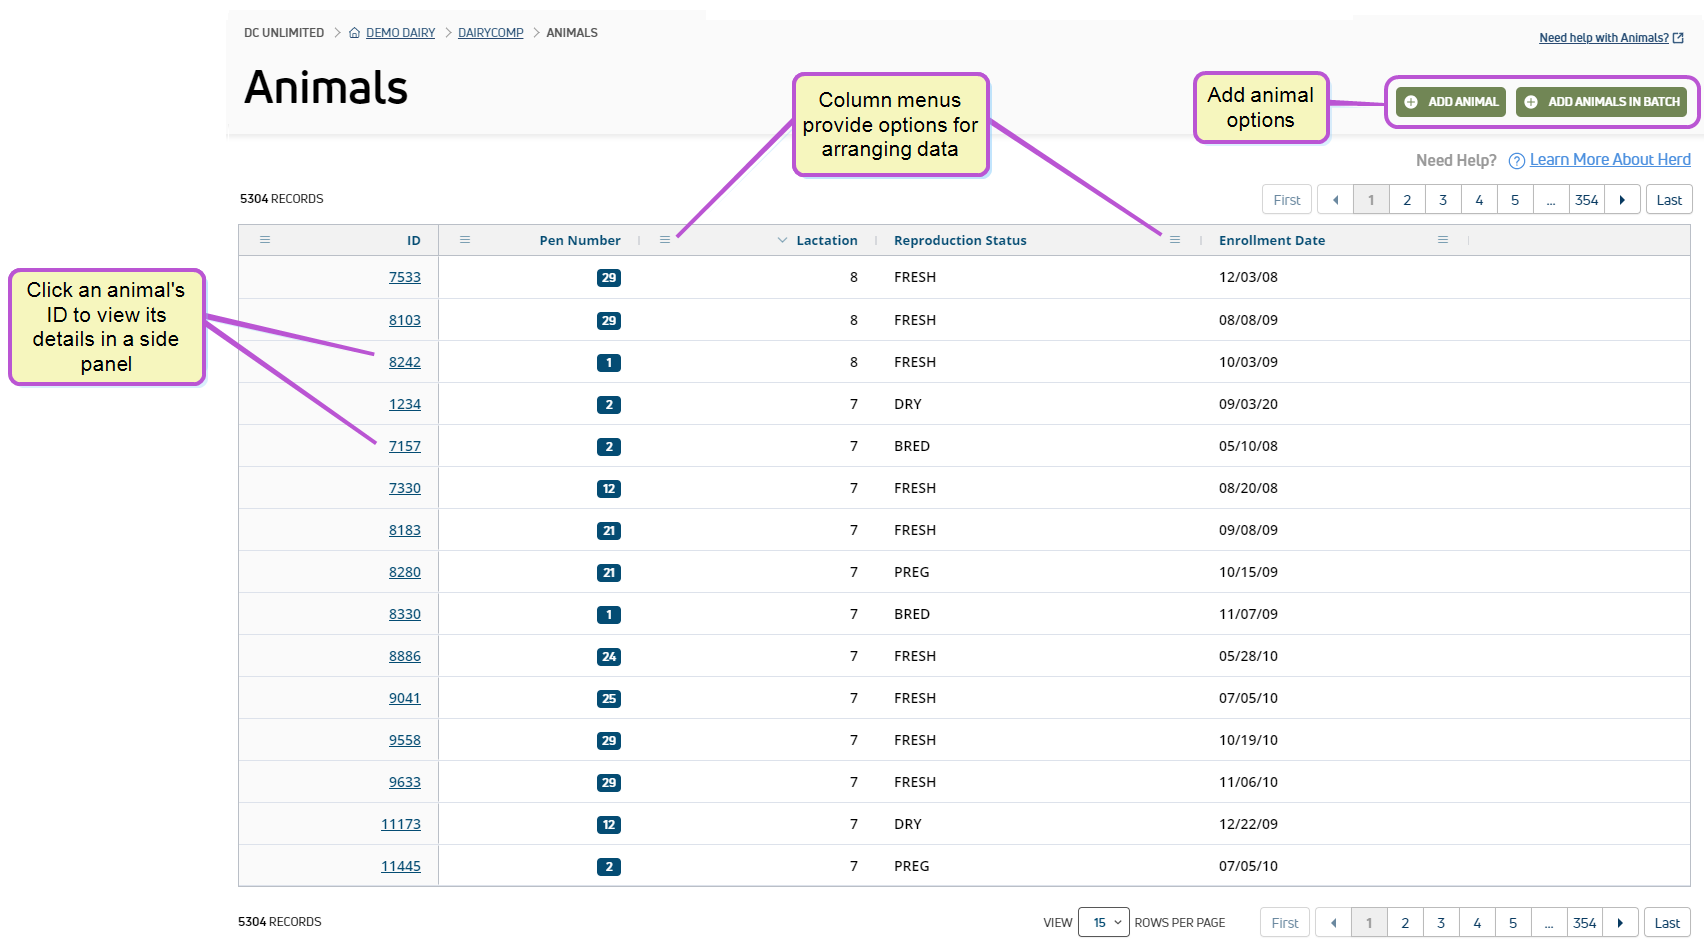
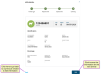
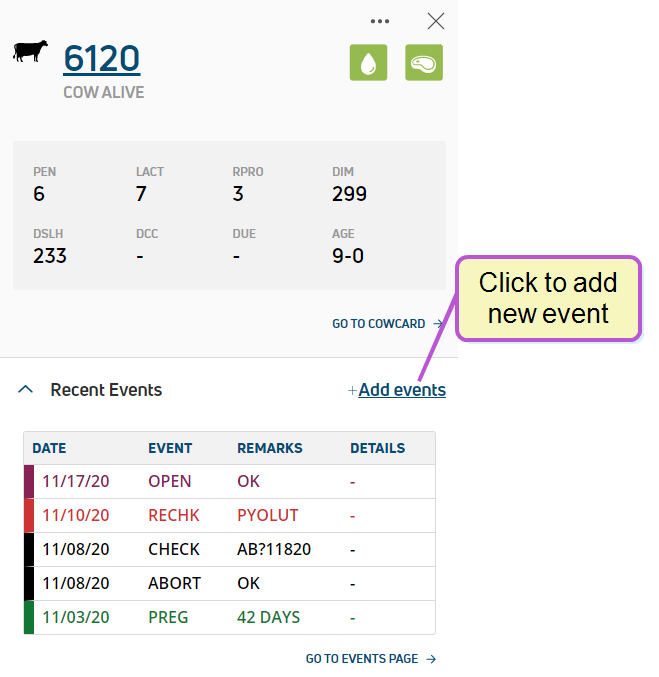
The Animals page displays the animals in your herd by ID![]() Identifier number, along with numerous other columns of information about each animal. To quickly view a summary of an animal, click on its ID number to bring up a side panel containing details about it. The side panel provides an overview of key information about the animal without leaving the page:
Identifier number, along with numerous other columns of information about each animal. To quickly view a summary of an animal, click on its ID number to bring up a side panel containing details about it. The side panel provides an overview of key information about the animal without leaving the page:
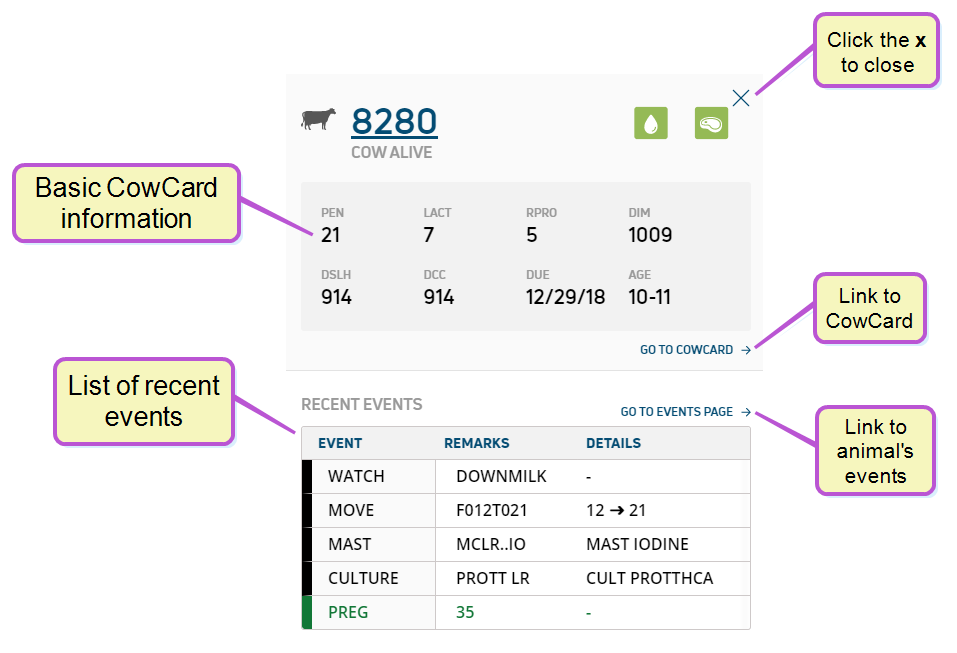
Once a side panel is open, you can use the left and right arrow keys on your keyboard to step through side panels for the next/previous animals in the list. To close the side panel, click the X button in the top-right corner or press the Esc key.
Herd Write permission is required to use this feature. See Edit User Permissions if you need help updating user permissions.
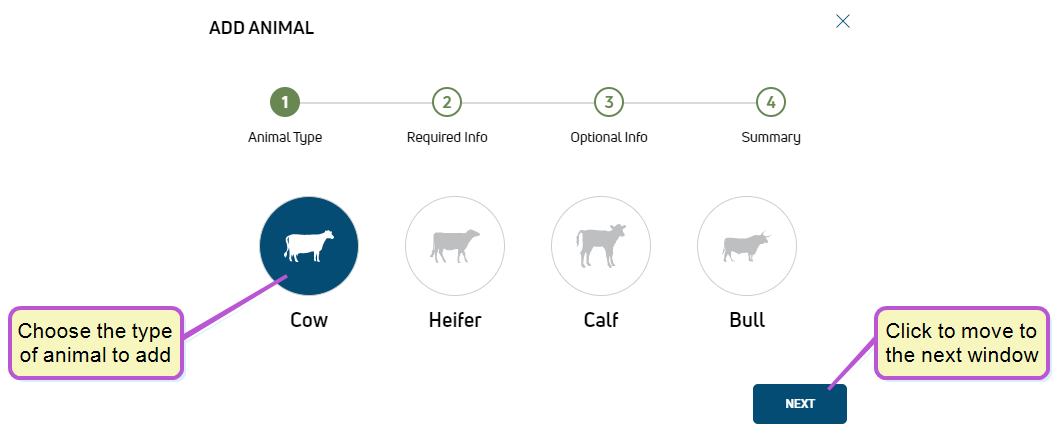
Click the Add Animal button  at the top right of the Animals page to launch the Add Animal wizard.
Start by choosing the Animal Type in Step 1 of the wizard:
Note the following points as you step through the remaining wizard pages:
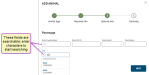
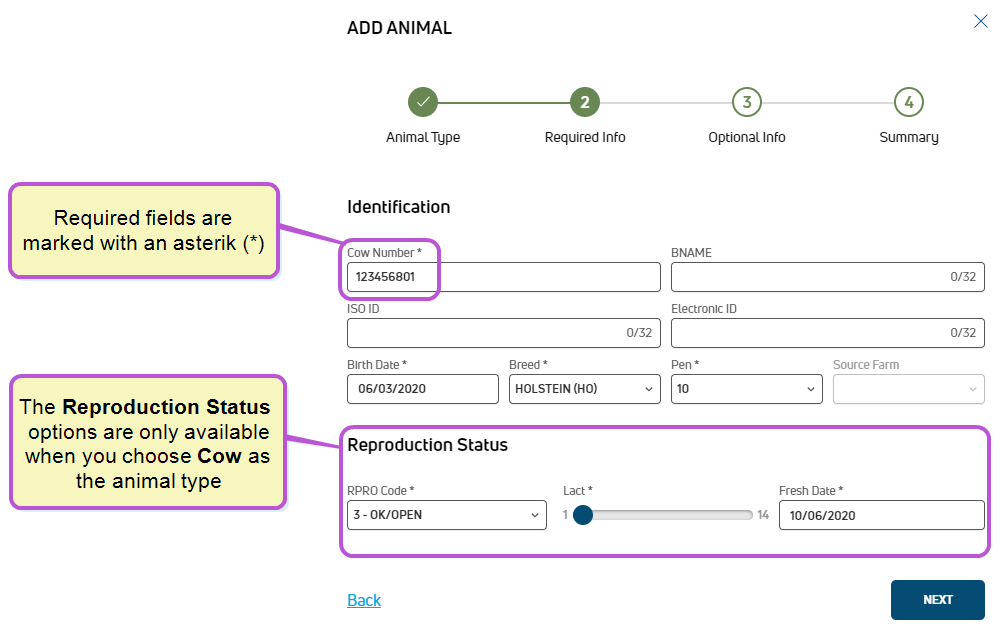
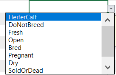
- In Step 2: Required info, the required fields are marked with an asterisk (*). The Reproduction Status options are only available when you choose Cow as the Animal Type in Step 1 of the wizard:
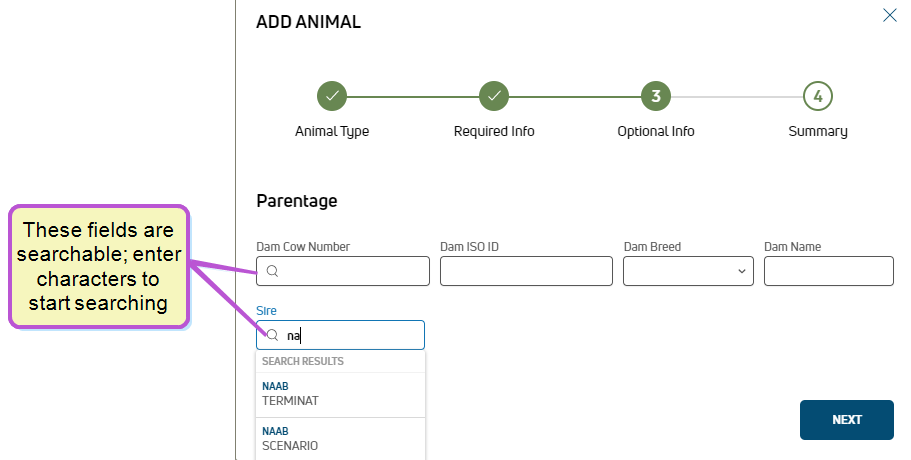
- In Step 3: Optional info, all fields are optional. The fields under Parentage describe the dam and sire for the animal. The Dam Cow Number and Sire fields are searchable; start typing in these fields to search for matches:
- On Step 4: Summary, review the information for the animal and clickSave to add the animal. To change any of the information you've entered, click the Back button to return to the previous steps:
- After saving the animal, you can then view it in the animals list.

Herd Write permission is required to use this feature. See Edit User Permissions if you need help updating user permissions.
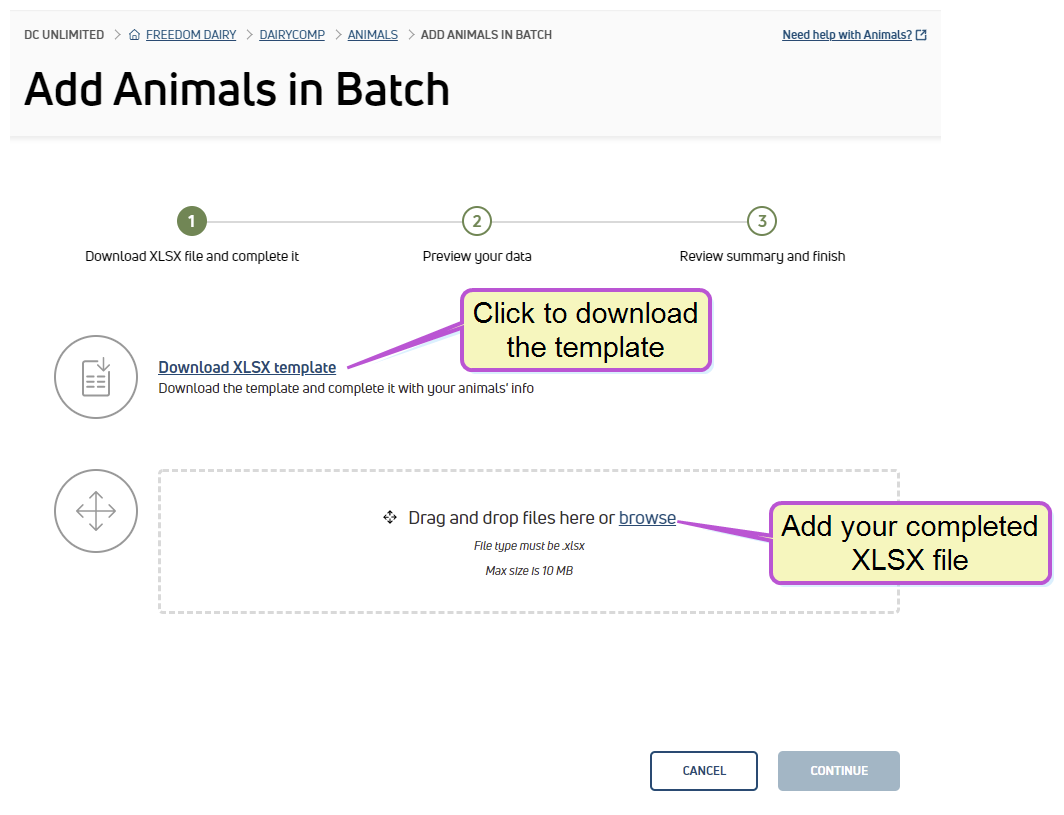
- Click the Add Animals in Batch button
 or select this option from the DairyComp menu. The Add Animals in Batch page displays:

- Click Download XLSX template to save the spreadsheet to your computer or network.
- Add animal details to the XLSX file and save it.
 Click here for step-by-step instructionsThe XLSX template includes tips to help you add your animal data. Click the cell to see the tip:
- Add required data for all animals. Required fields are bolded in the template.
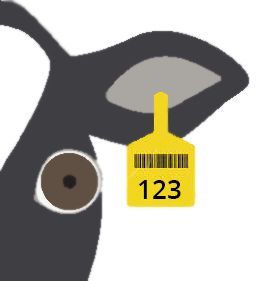
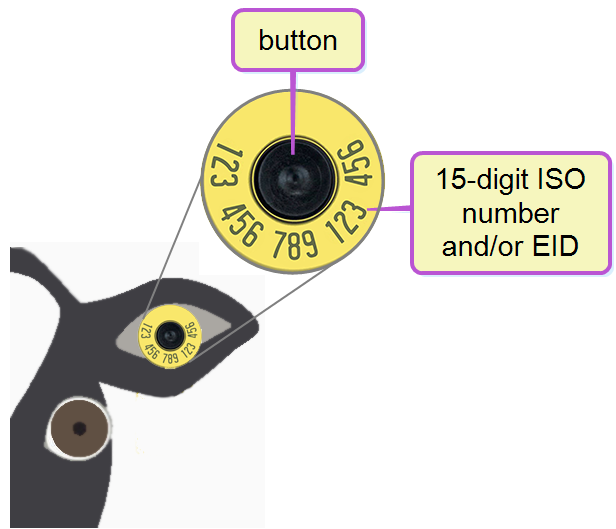
- CowNumber: Number assigned to the animal, usually visible on the eartag:

- Breed: Two-letter abbreviation for the animal's breed. Common Cow breeds include the following: HO = Holstein; JE = Jersey; AY = Ayershire; BS = Brown Swiss; GS = Guernsey; MS = Milking Shorthorn; XB = Beef cross-breed; XD = Dairy cross-breed
- BirthDate: Animal's date of birth (any format)
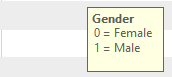
- Gender: 0 = female; 1 = male
- Lactation: Current lactation number. Enter 0 for heifers and bull calves.
- PenNumber: Animal's pen number
- CowNumber: Number assigned to the animal, usually visible on the eartag:
- Enter additional required details for cows:
- FreshDate: Date of FRESH event (calving) for the current lactation
- ReproductionCode: Use the drop-down to select the cow's reproduction status, which automatically translates to a code:
- Add optional data.
See all optional fields here
- CowName: Common name for the animal
- IsoId: 15-digit ISO International Organization for Standardization, a global organization that promotes commercial and industrial standards. number associated with the animal eartag, often the same as the electronicID. If the electronicID changes, the isoId does not.
- ElectronicId: 15-digit electronic ID (EID 15-digit electronic ID number associated with the animal eartag) number associated with the electronic animal eartag, often the same as the IsoId. The EID of an animal changes whenever the button in the electronic tag is replaced:

- EnrollmentDate: Date the animal was added to the dairy
- ConceptionDate: Date of animal's conception
- DryDate: Date the cow was removed from milk production in the current lactation
- SireId: Animal's sire ID
- SireName: Common name of the animal's sire
- SireIsoId: 15-digit ISO ID of the animal's sire
- SireBreed: Two-letter abbreviation for the breed of the animal's sire. Common Cow breeds include the following: HO = Holstein; JE = Jersey; AY = Ayershire; BS = Brown Swiss; GS = Guernsey; MS = Milking Shorthorn; XB = Beef cross-breed; XD = Dairy cross-breedcross-breed
- SireStudCode: Semen company identification. For a listing of standard identifiers for the US, see NAAB Stud Codes.
- DamNumber: CowNumber assigned to the animal's dam
- DamName: Common name of the animal's dam
- DamIsoId: 15-digit ISO ID of the animal's dam
- DamBreed: Two-letter abbreviation for the breed of the animal's dam. Common Cow breeds include the following: HO = Holstein; JE = Jersey; AY = Ayershire; BS = Brown Swiss; GS = Guernsey; MS = Milking Shorthorn; XB = Beef cross-breed; XD = Dairy cross-breed
- SpeciesType: This value defaults to Cattle.
IMPORTANT: If you are not adding data for optional fields, leave them empty. Make sure the file extension remains XLSX. If you change the extension, the file upload will fail, resulting in an "Invalid File Type" error: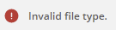
- Add required data for all animals. Required fields are bolded in the template.
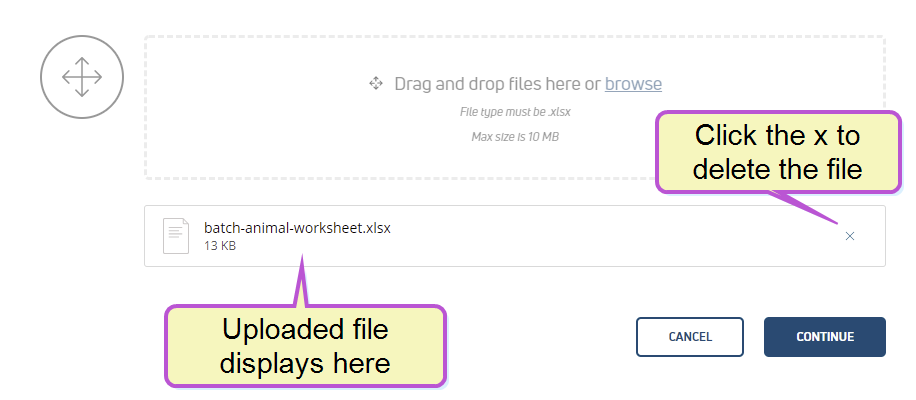
- Drag and drop your XLSX file onto the Add Animals in Batch page, or use the browse option to find the file on your computer or network. The file you added displays below the drag and drop area of the page:
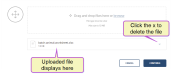
If you added the wrong file, click the x to delete the file.
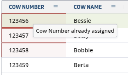
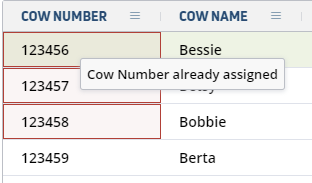
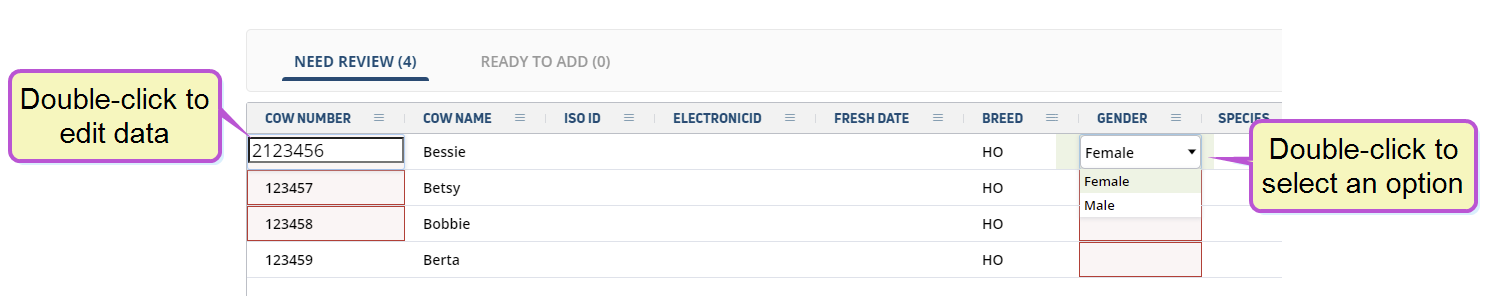
- Click Continue. The system processes your file and uploads animal data. If any errors exist, the Need Review tab displays your animal data with errors highlighted and marked in red. Hover over the data to view the error:
- Double-click any cells with errors to re-enter the data or select an option from a drop-down:
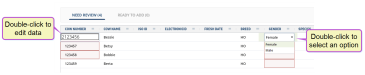
As you address errors, the animals move from the Need Review tab to the Ready to Add tab. After all errors are addressed, click Continue. The Ready to Add tab displays the animals you added.
- If the data is correct, click Continue to finish adding your animals. If you need to make corrections, click Cancel, correct the animal data in your XLSX file, and return to step 3.

Herd Write permission is required to use this feature. See Edit User Permissions if you need help updating user permissions.
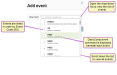
- Click the animal's ID to view its details in a side panel. Click the Add events button:
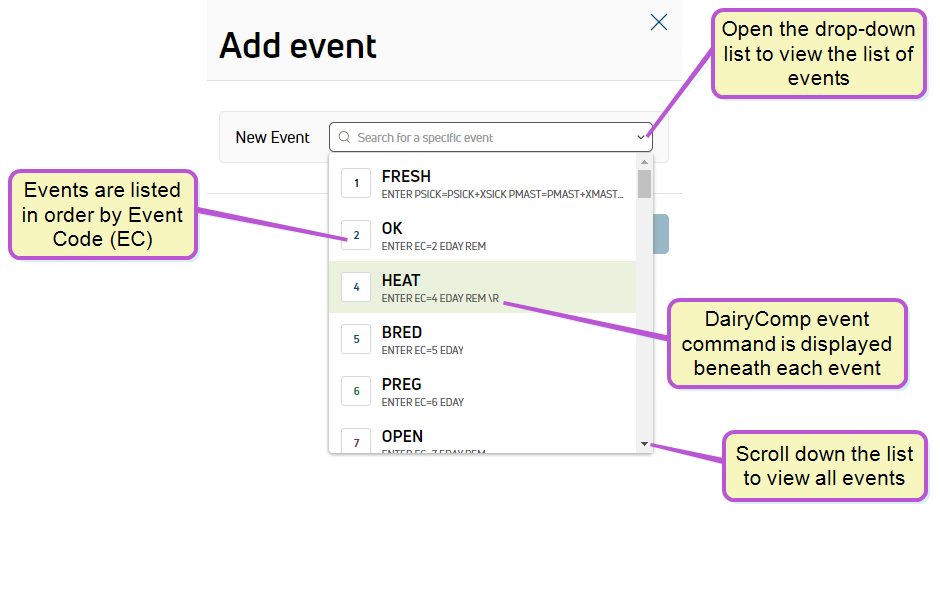
- The system displays a side panel, where you can select the event you want to add from the New Event drop-down list:
 Follow the guidelines below when working with events.
Events are listed in order by Event Code (EC).
Scroll down the list to view all events.
The DairyComp event command is displayed below each event.
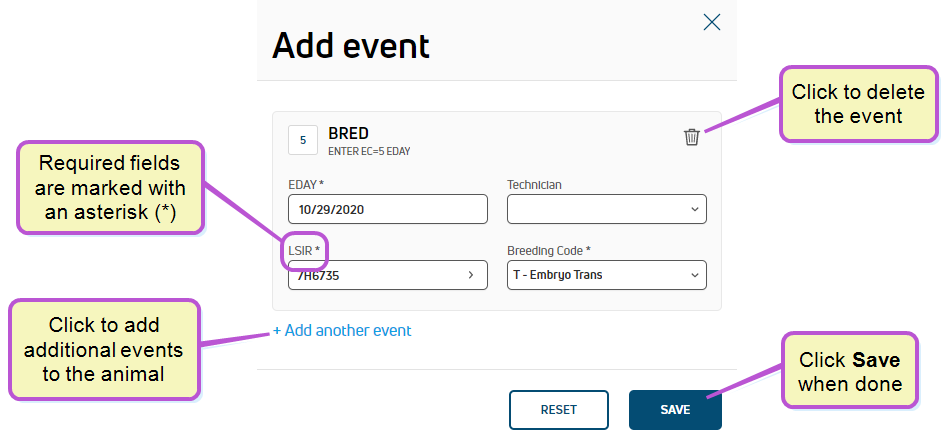
- Enter the details for the event in the applicable fields:
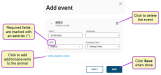
The details required in this step depend upon the type of event you're adding. The example above adds a BRED event. For more information about the details required for each type of event, see Event Definitions.
Click here for some guidance on adding event details.- Required fields are marked with an asterisk (*).
- To add additional events to the animal, click Add another event.
- To remove an event, click the delete icon
 .
.
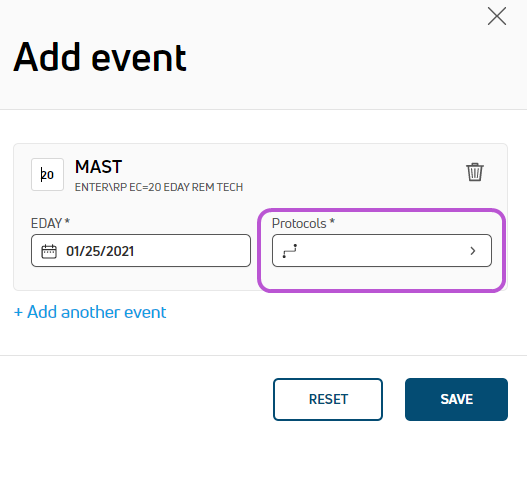
IMPORTANT: Depending on the type of event you're adding, you may receive system prompts that warn you about an animal's status. See Warning Messages when Adding Animals to Events to learn more. - Define protocols for the event (if applicable).
Certain events allow you to select a treatment protocol, such as drugs to be administered or treatments to be applied to the animal's hooves or udders. If you are entering an event that includes protocols, you will see the Protocols
Dairy protocols include a series of treatments or tasks that follow a prescribed order and schedule. Protocols may be defined for reproduction purposes, to treat an illness, or for routine vaccinations. field as an option for the event: How do you add protocols to an event?
The treatment protocols for each eligible event are pre-configured so that they are available when you add the event to an animal. (See Protocols to learn more.)
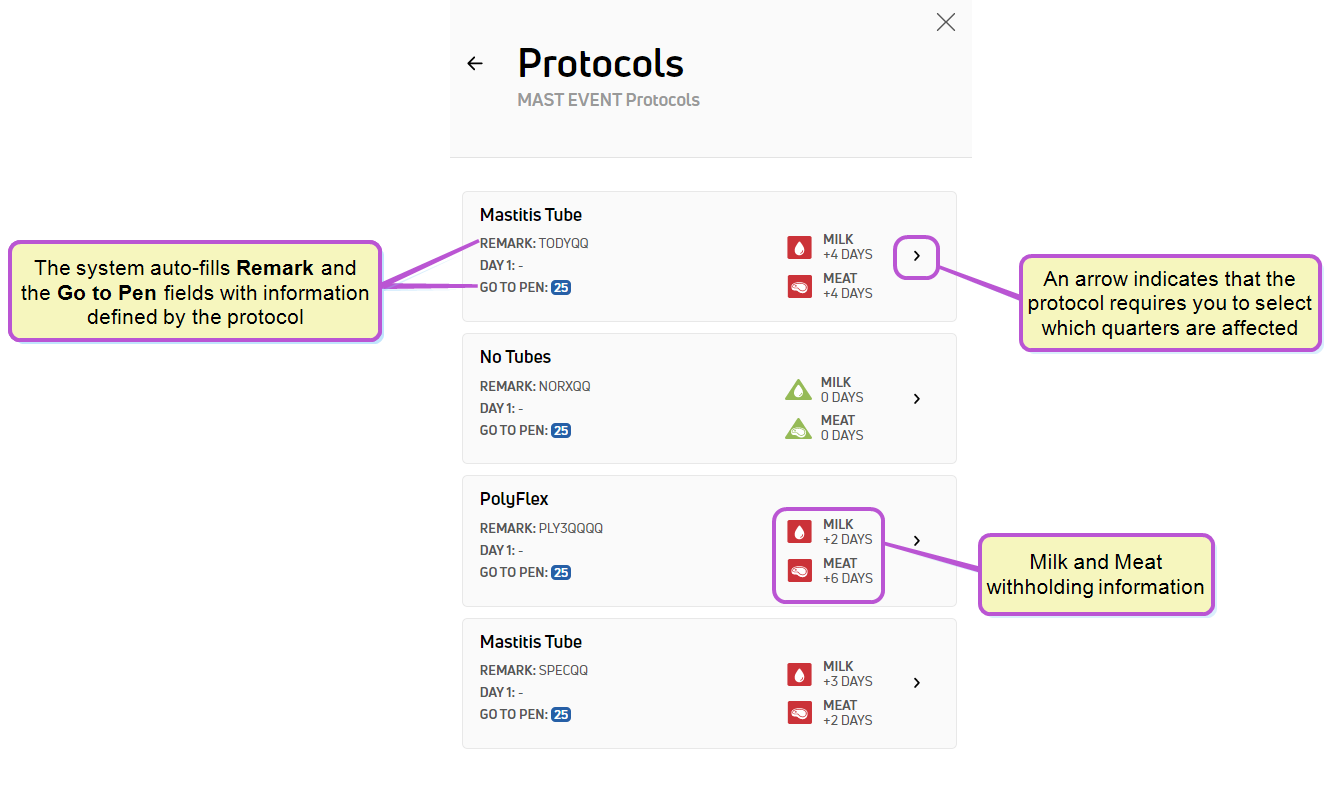
- Click the Protocols field to view the available protocols for the event:
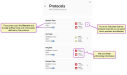
For each protocol, the system displays the corresponding Milk and Meat withholdings. Additionally, the system auto-fills the Remark field and the animal's pen (Go To Pen) based on the selected protocol. You may select only one protocol per event.
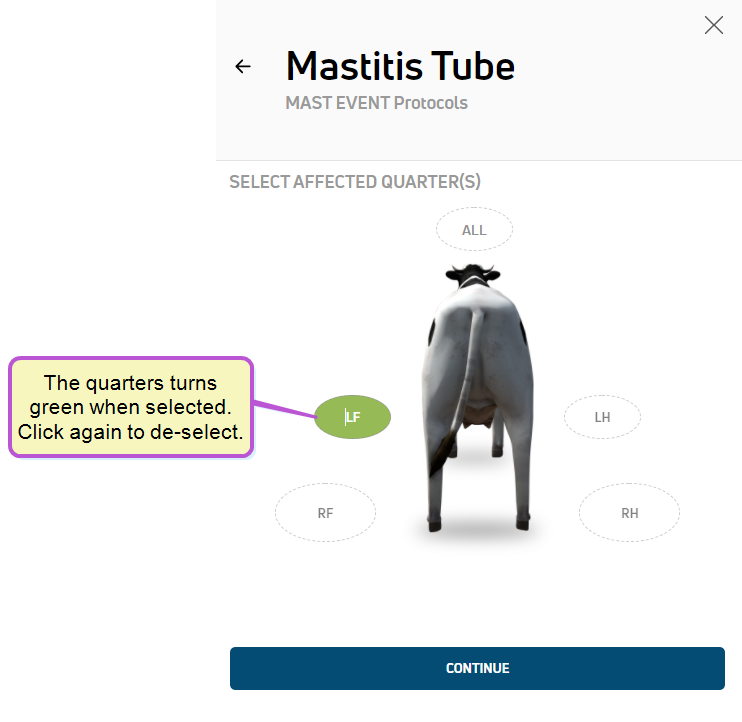
- If you select a protocol that requires you to choose which hoof or quarter of the udder is affected, the system opens a page where you can select the quarter(s):

The labels you see may be different from those listed below, but the typical ones are:
- ALL - Selects all quarters
- LF - Left Front hoof or teat
- RF - Right Front hoof or teat
- LH - Left Hind hoof or teat
- RH - Right Hind hoof or teat
See Events with Protocols to learn more.
- When you are done selecting the affected quarters, click Continue to return to the Add Event window. From here, you can choose additional events for the animal, and then click Save.IMPORTANT: The mobile app section of this document includes additional information about using protocols with events. See Events with Protocols to learn more.
- Click the Protocols field to view the available protocols for the event:
- Click Add another event to add additional events to the animal (optional).
- Once you have entered the events and details, click Save.
This feature/option is available only for DC Pro Beta testers. DC Unlimited subscribers will not see it in the PULSE Platform because this functionality is available in on-premise DairyComp.
Check the top of your PULSE Platform page to see if your dairy has DC Unlimited or DC Pro:
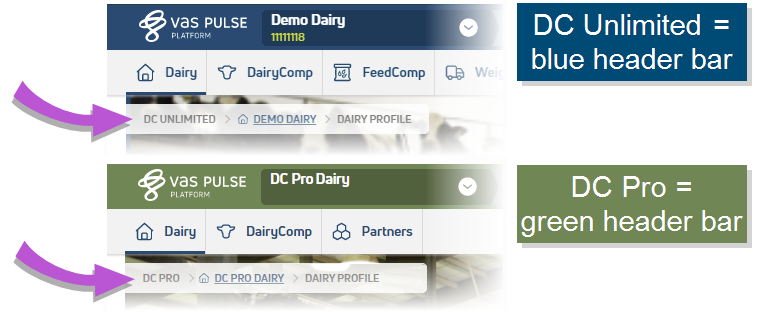
Click here to learn more about the different versions of PULSE.
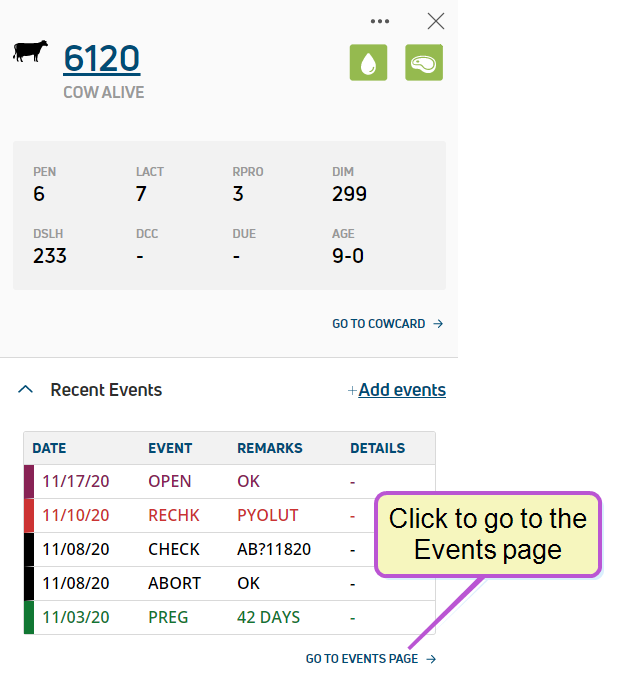
- Click the animal's ID to view its details in a side panel. Click the Go to Events Page link:
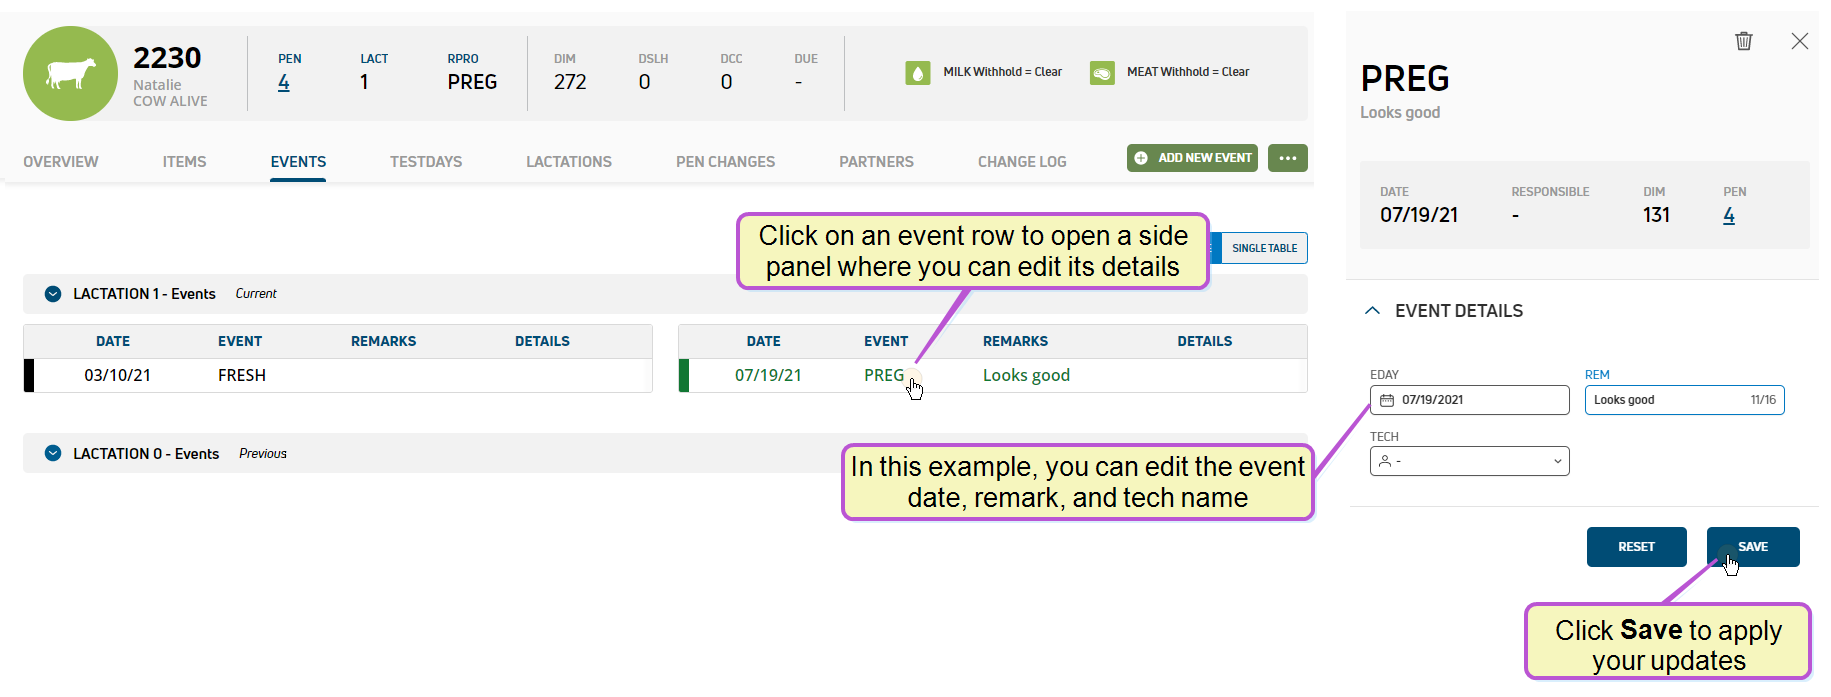
- Click on the desired event to open the event's side panel:
- Follow the guidelines below to complete your edits:
- You can only edit events from the current lactation.
- Some event updates may reverse past event actions. For example, if you delete a MOVE event where an animal was moved to a new pen, the system will move the animal back to its previous pen.
-
Click Save to apply your changes.
- Click the animal's ID to view its details in a side panel. Click the Go to Events Page link:
- Click on the desired event to view its details in a side panel.
- Click the delete icon in the upper right corner, then click Delete in the pop-up confirmation window to complete the deletion.
Click the animal's ID to edit its details in a side panel.
Note the following points as you edit your animal details:
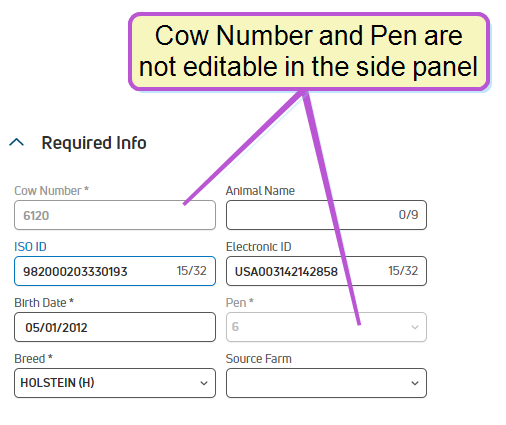
- Required Info: Cow Number and Pen are not editable, but they can be changed by adding animal events. Add an XID XID is short for "Change ID", as in changing an animal's ID number. event to change Cow Number or a MOVE event to change the animal's Pen. Required fields are marked with an asterisk (*):
- Reproduction Status: These fields are not editable. To change the reproduction status, add a reproduction-related event:
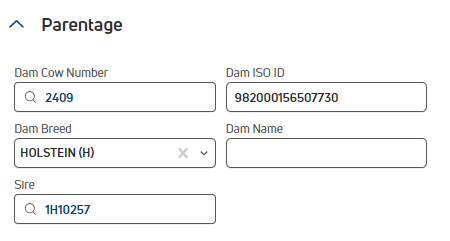
- Parentage: These details are optional:
- Click Save to update the animal.
This page uses interactive column headers that allow you to arrange the data on the screen into a way that's most useful to you. You can add new columns of data, rearrange and reorder them, and filter some columns. To access these features, click on the column menu in the column you want to change:
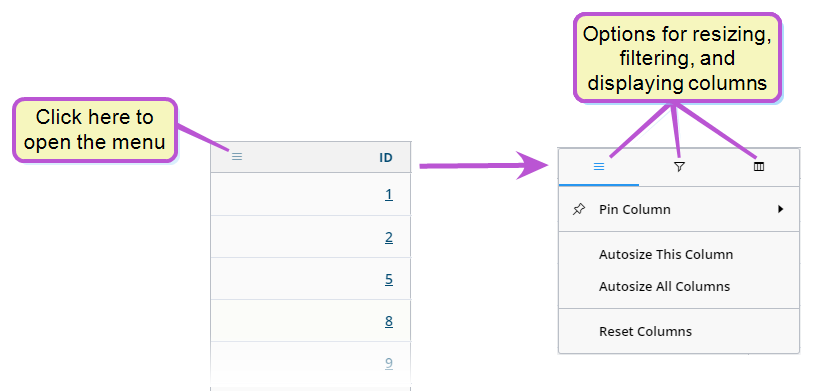
The top menu offers three different options—one for resizing the column, one for filtering the data displayed in the column, and one for controlling which columns are displayed. Each menu contains various ways for manipulating what's shown on the page.
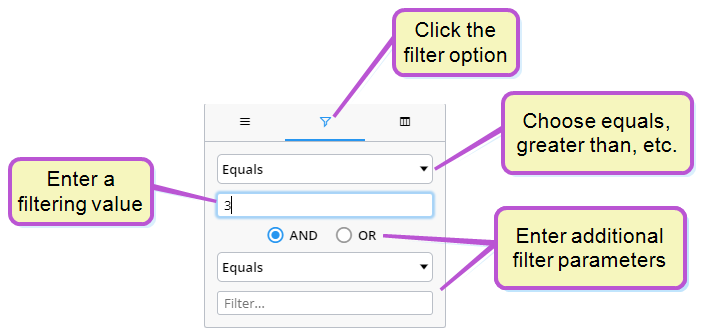
Columns that contain numeric values can be filtered to show only certain data. For example, to filter the Lactation column so that only animals with a lactation value of 3 display, click the filter option, and then use the fields to create your filter:
You can reorder the way columns display by clicking in the header of the column you want to move and dragging it to its new location.
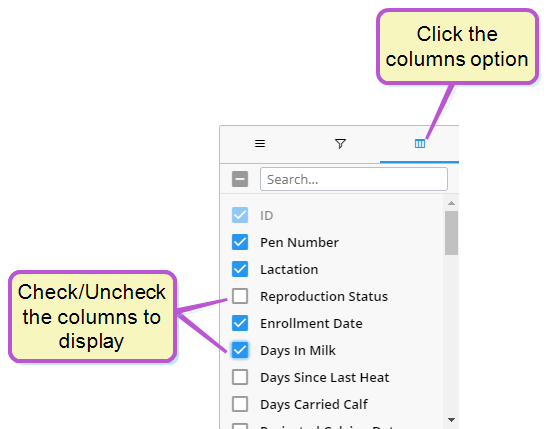
To add or remove columns from the page, click the columns option, then use the checkboxes to select which columns to display:
You can also remove columns by clicking on the header of the column you want to remove, holding down the mouse key, and dragging the column up and out of the table.